Moshav Shorashim
Handbook for House Design
Center for Environmental Structure, 1982
How to Use This Notebook
This notebook has two parts. In the first part, we explain what kind of place we expect this village to be, and a fairly simple way to achieve the expected result. The second part is a set of rules which will help you and make the design of your house easier.
However, these rules alone cannot help you in generating a beautiful environment. This depends entirely on your personal ability to make it such, and, we believe, this ability will be considerably increased if you completely feel and understand what is said in the first part.
It is therefore crucial that you read the first part very carefully and certainly more than once—and that you do not start the design of your house until you are positive that you have established a complete and deep understanding of every single thing that is explained in the first part.
PART I – CENTERS
In this first part, we are suggesting a way to look at things and also to make things. From our experience, we believe that this is the safest and the most correct way to appreciate the beauty of physical objects and especially to make physical objects that are beautiful.
Look at this leaf. This leaf has a very beautiful structure due to the way the various centers of it work together. Observe it very carefully and try to understand how all these centers work so that the whole leaf feels very strongly focused to a main center.
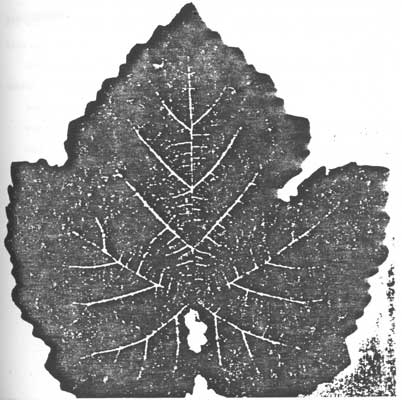
Look at the small centers of the leaf; look at how they push the emphasis to some centers at the end of the veins. Look now at how these bigger centers cooperate together to orient the focus at a place away from the beginning of the leaf's spine. There is the main center of the leaf.
Look now more carefully and you will see that a lot of additional things work as centers and help in establishing this feeling of focus that the leaf has: the size and the shape of the stem, the shape of the spine, etc. Look also at some more centers that are outside the physical area of the leaf, right next to its point: they also feel as two pulsing fields and work together with all the other centers to help reveal the main center.
Observe this leaf for awhile until you understand what a center is and how many centers may work together. Now we believe that it is clear to you that:
— what we mean by "center" does not have so much to do with the mathematical meaning of the word, overall symmetry, etc. but with the real life of the leaf;
— that centers exist not always in the mass of a physical object but also in the space around it;
— that whatever fraction of the leaf you take you will recognize a structure made out of centers. Each of them cooperates with other centers in creating a bigger center so that each center is created by an arrangement of other centers.
We now ask you to look around you for awhile and study the structure of some objects in the same way we studied the structure of the leaf. Look at any kind of object: teacups, pens, bottles, chairs, windows, etc.
We are sure that after many of these experiments you discovered that the structure of certain objects is very loose and poor while the structure of other objects is very powerful. In other words, in some objects you can recognize more centers, in the way we have defined a center, than in other objects.
Now rely on your feelings and ask yourself which of the things you observed around you are the most beautiful, so beautiful that you can identify with them. You will find out that the things you think are the most beautiful, are the ones that have more centers, the ones that have a really powerful structure.
Look now at the pictures #2 and #3 and study their structure. The coffee cup on the left has obviously more centers than the one on the right; this is why it feels more beautiful. Try to think then which of the two is a better coffee cup. You will realize that the one on the left functions better as a coffee cup than the other on the right.
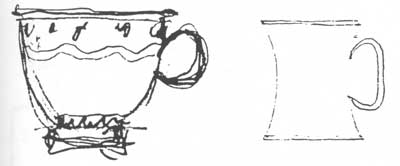
Look now around you again at certain objects that are of a precise use. You will feel this in every single case: the ones with the more centers, i.e. the most beautiful, are also the ones that function the best.
Here we want to make clear for you that the centers are not something that only objects with a specific use may have. They apply in the same way to things that are purely ornamental.
Now you must wonder, "Is it possible to do that with something that has straight lines, such as a building?"
Here is a plan of a rural house of the beginning of the century. Look at this drawing in the same way you look at the leaf, trying to recognize where its main center is.
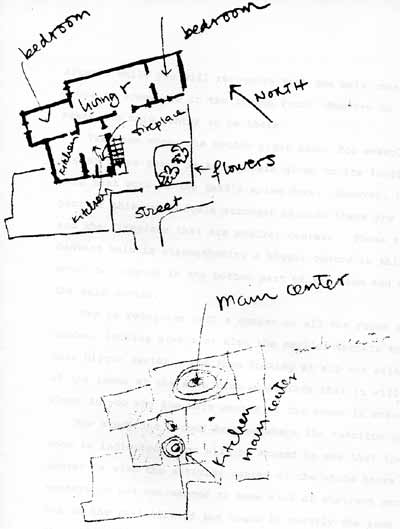
After a while you will recognize that the main center of this house is somewhere in the living room. Now try to see what makes the main center to be there.
Take one room, the bottom right room, for example. By its proper shape there is an emphasis given to its longitudinal axis that acts as the leaf's spine does. However, the bottom part of this spine feels stronger because there are the window and the fireplace that are smaller centers. These smaller centers help in strengthening a bigger center in this room which could be located in the bottom part of the room and which is the main center.
Try to recognize such a center in all the rooms and in the garden, looking always at also the smaller centers that help this bigger center. And then looking at all the main centers of the rooms at the same time, we believe that it will become clear to you why the main center of the house is where it is.
Now study the second drawing where the function of each room is indicated. You will be amazed to see that the main center is also the activity center of the whole house and that centers do not correspond to some kind of abstract geometry but to the real life of the house in exactly the same way they did with the leaf.
Now we believe that you are somehow acquainted to study the structure of things through their centers.
Before we defined anything on the site of the moshav, we first studied its structure very carefully: in other words we recognized the centers that already existed there. These centers were formed by the height of the hills, the curves of the ground, the view, some important trees that existed there. By defining the location of the main square, the main path, and the house cluster, we simply did one thing: we tried to create more centers on the site that would cooperate with the existing ones so that the whole settlement starts becoming beautiful.
However, the schematic plan that has been worked out by us suggests a very limited number of centers. The rest of the centers will be created by each of you while you will be designing and building your houses.
This means that you have to create centers with whatever you design and then build in the village; and in order to be successful with that, you have to study the structure of what already exists there, maybe just the site or both the site and whatever else has been designed and/or built there.
Remember again that a center is produced by an arrangement of other centers. This means that in order for the house cluster to be a center, the houses, the garden, and the common land have to be centers; in order for the house to be a center, the rooms have to be centers; in order for the rooms to be centers, the windows, the doors, the alcoves, have to be centers, too.
The task you are asked to do is not a simple one. You really have to concentrate to the very center that you are creating each time without thinking of anything that may happen next, but just concentrating your efforts to make this center that you creating such that you really like it.
PART II – THE RULES
It is important that when you make the design of your house, you are on the site. It will be much easier if for any single thing you design, you know exactly how big it is going to be and exactly where it will go.
All decisions that you make, you will mark on the ground. You thus have to have a number of stakes ready before you start. Some of them have to be bigger and may be painted white so that you mark the corners of the house and the garden. Additionally you will need some red stakes to mark some important centers that you will create. Some pieces of string, or some red paint could also be useful to mark in a detailed fashion whatever you design.
If, however, there are things that cannot be marked on the ground, then you can draw them or keep some notes about them. This should come after you have marked the essential things on the ground.
Each of the rules in this notebook asks you to create a center. You will create one center at a time following the exact order that these centers are presented to you here.
You have to be very careful while working with each specific center. First you visualize it, then you mark it on the ground but you always ask yourself one and the same question: "Do I really like that?" Only when you are positive that what you visualized and marked on the ground is something that you really like and that you would like to live with it for all you life, can you go on with the next rule.
Working in this fashion you will not need to change what you have already done. You must not go back and change your previous decisions.
A. THE BASIC FEATURES OF YOUR HOUSE AND THE COMMON LAND
At this point you know approximately the location of your own land in a house cluster and also the general layout of this cluster in terms of where the houses are, how the path goes and where the shared common space is. You are asked now to define in a precise fashion the general features of your house and garden and at the same time to shape the house cluster and especially the main path and the shared common space.
The most important thing that you have to remember during this stage is that it is not sufficient for you to make only your own house and garden beautiful. This will be of very little value if, at the same time, you do not make the common spaces beautiful, too. Because, as you will need a house that you will really like to live in for all your life, you will also need the spaces that you will be crossing every day, the spaces where your children will be playing, the spaces where you will meet your neighbors, to have this same quality.
Before you start applying the rules you must have in mind the following:
1. Before you make any decision it is absolutely necessary that you completely understand what the structure of the site is. In other words, you have to recognize what the centers are that exist there. These centers may exist on the site itself: the view, the ground make-up, the slope, trees that exist there or just some rocks that orient the course of the path—or they may be centers that were created there either by the definition of the general layout of the cluster, or by the decisions of your neighbors who have designed their houses before you.
2. You have to feel responsible in exactly the same way about the centers of your house and the ones of the common land. If you remember the example of the leaf we were talking about, centers existed not only within but also outside the physical mass of the leaf. In exactly the same way, you have to bear in mind that your garden cannot be a center if what is left outside is not a center, too; and the other way around, that the common land cannot be a center if your garden as well as the other gardens are not centers, too.
3. It is obvious that your house is not going to be related in terms of distance in the same way to all the centers of the common land. This means that there will be some centers of the common land that your house will more directly affect. It is, however, equally true that there will be no major center in the common land that your house will not affect, no matter how far from the house this center is.
Let's assume that your house is next to the entrance of the main path, and that you are asked at a certain point to define your garden wall: the boundary between your garden and the main path. You must not be concerned only with the center that you are creating, but also with how this center will help some larger centers of your house cluster. This center, apart from creating some centers next to it, in the inside and the outside of the garden must orient the focus to a bigger center of the common land: the view terrace or a tree…
Therefore, while creating a center, take care of some bigger centers that this center affects and make it such that it influences these larger centers in a positive way.
4. It is important that you make one decision at a time and that you do not go on to the next one until you are positive that you really like what you have designed. Then you mark it on the ground and you also mark the center that you have created with a red stake.
5. Finally, remember that when you create a center, you must not be worried about what will happen next.
The question that you have to ask yourself, when, for example, you are trying to define the volume, will not be: "How shall I shape this volume so that the kitchen could be placed in a convenient location?" but "How shall I shape this volume so that when I look at it from afar it will feel nice and centered?"
In each cluster there will be one family at a time designing their house. As soon as this house is designed, it will be considered for the next family as part of the structure of the cluster. Of course, it is difficult for the families to visualize what the previous families have created from just the stakes that are on the ground. We think, therefore, that it is very important that the major stakes, i.e. the ones that mark decisions that are clearly going to affect the decisions of the neighbors, are large, clearly visible, and painted white.
6. As you go through the rules one by one, you will need to mark your decisions on the site, to help you to visualize your house as you are designing it. Mark your decisions in the following way:
When you have decided where a certain center will be located, use a RED STAKE to mark its position, or its center.
If you have decided on the SIZE of a certain thing, (for example, the garden, or the main room) put stones or loose branches at the corners, to give you an idea of the size and shape of this thing.
Most rules will be accomplished by placing red stakes; a few of the rules will be accomplished by placing stones or branches at the corners; YOU MUST, HOWEVER, DO SOMETHING WHEN YOU COME TO EACH RULE. YOU MUST PLACE EITHER A RED STAKE AT THE CENTER, AND, IF IT'S NECESSARY, STONES OR BRANCHES AT THE CORNERS.
Now you are ready to begin with the rules, on the site.
1. THE MAIN PATH
There is a path leading from the village center to your house cluster. This path is the spine of the cluster, off from which the houses "hang", oriented towards the main center of the cluster, which is the common land.
You know at this point the rough course of the path. You also know, approximately, the site where your house and garden will be. Now you are asked to define an imaginary wall at the edge between the path and your site. In order to define this wall, walk on the path for a while having in mind that this path has to lead nicely into or along the common land, and ask yourself, "Where do I have to build a wall so that this path feels comfortable and right?" This means that within the range of some few meters you have to find such a location for this wall that the space defined along the main path is nice and centered, and so that its width feels right—and so that, in an emergency, a car can go through.
Place two red stakes at the most critical points at the edge of your site, to define this path.
2. SMALLER PATHS
In case there is a smaller path, starting from the main path, between your house and an adjacent house, you also have to define the shape and the size of this smaller path.
In order to do this, place an imaginary wall which will define the edge between the smaller path and your site.
When you do this, think carefully about the width of the smaller path, and the space that will be formed there. Bear in mind that it is not as wide as the main path and that it is only for pedestrians to walk on.
Walk along the path, and try to feel the space between the house that is already staked there, and your house, which you are first staking out.
Place two red stakes at the most critical points along the edge between the secondary path and your site.
3. THE COMMON LAND
There is a space in every cluster that all the houses share; this space "pulls" all the houses around it and glues the whole cluster together. This space, the common land of the cluster, is the main center of the house cluster.
The common land of the cluster is an elongated piece of land that follows the course of the main path. The width of the common land may vary along its length. Its narrowest parts, possibly at the end, have to be wide enough for a car to go through in cases of emergency. At the points the common land widens up, it can be as wide as necessary to provide for a pleasant outdoor place; however, in any case the width of the common land should not exceed half of the total length of the outdoor space of the cluster.
You already know the location of the common land in your house cluster, and you also know the approximate location of your site. The common land will be shaped by the individual families together with the layout of the individual houses. Each family will contribute to the shaping of the part of the common land that touches its house and is tightly connected with it.
Therefore, now, you are asked to define the shape of the common land that is touching your site by defining an imaginary wall at the edge between the common land and your site. As you did with the main path and the smaller path, walk on the common land trying to visualize this imaginary wall that will define the shape of the common land in a nice way. Then stand inside your site and try to see again where this wall should be so that both the space of the common land and the shape of your site feel comfortable and right.
Remember that you are responsible for the shaping of the common land and that you have absolutely to contribute to that, so that you can make it nice and centered.
Now, place two red stakes at the most critical points along the edge between the common land and your site.
4. THE MAIN CENTER OF THE COMMON LAND
Try to identify the most important center of the common land of your house cluster. This is the nicest and the most pleasant place in the common land. It may already clearly exist there, or it can be potentially developed: an important tree, or a nice view that calls for a view terrace to be built, or just a nice flat piece of land.
What you have to do at this point is to identify carefully this main center of the common land by placing a red stake at its center of gravity. Then, you have to pay attention to the shape of the common land so that it respects and enhances the presence of this main center.
In order to do this, look at the edge of the common land defined by your site, or at some edges which are still undefined. You might have to move the edge slightly between your site and the common land that you have already defined, a bit forward or backward; you may have to adjust their angles; you might have to introduce some slight curve, or you may have to place some other low wall or ledge.
Whatever you feel is needed to be done, do it bearing in mind that it has to strengthen the main center, and to help to concentrate the focus of the common land and the whole house cluster to it.
5. THE GARDEN
Now within the boundaries that you have defined, find a spot in which you would like the most to have a garden… There may be just one spot like that or two: if there are two, you will have a major and a minor garden. Your garden is going to be the main center of your house, from which your house and your life will radiate out and circle around. Remember also that such a center is going to be one of the most important centers of the whole house cluster; it therefore has to be placed in away so that it feels such.
Make sure that the place where the garden will be has enough room so that the garden can be big enough for your family, and nicely shaped.
6. HOUSE POSITION
Now find on which side(s) of your garden you would like your house to be.
Locate the house in such a way so that it benefits from the garden and leads into the garden in the nicest way. Maybe you should enclose your garden mainly from the north so that your house faces south to the garden.
At this point you must take into account the maximum size of the house: it is 74 m2. Do not make it any larger than this, and maintain this size during all steers which follow.
7. GARDEN WALL
Now define the outline of your garden as a whole, including the house. Visualize a rather high imaginary wall all around it. Of course one side of this wall, maybe more, will be one of the walls of the house when the house is exactly located later.
For the time being, you have to give to this garden a really definite and nice shape with a definite boundary so that it becomes a solid space with a real feeling of being centered.
At this point, you have already roughly located your house and its garden with respect to the main center of the common land, which may be close to it or far from it.
Now, start to see what other centers of the common land are close to your house, so that the precise shaping of the volume of your house helps them in a direct way. It may be the view terrace that your house will help to define, or the entrance of the main path to the house cluster, or a place around a tree in case there is a nice tree in the common land, etc. There may be all of them, or just some of them.
However, you will have personal responsibility to conceive one or more of these smaller centers in the house cluster. Your house, as every other house, has to contribute to the creation of one or more of these smaller centers that form the house cluster and give to it its specific character, charm and intimacy; and first of all, and in a definite way, your house has to contribute to the creation of this center which is closest to your house, and which is most tightly connected with it. After this is accomplished you can go on with the establishment of any other smaller center of the house cluster.
8. THE VIEW TERRACE
There is a part of the cluster which has the best view. This part can be a distinct center of the common land in which people can sit, talk, and enjoy the view. To feel really comfortable, this part has to be defined from at least one side by the wall of a house or of a garden. Also, if there is space available, this view terrace could swell outwards, being somehow pulled by the view.
Define the location and shape of this view terrace.
9. A FLAT PIECE OF LAND
At some point the main path widens to incorporate a nice flat piece of land. It is a well-defined space, perhaps with a lower wall at one or more sides of it; it may be large enough for children to play there or smaller and more intimate where people could sit and talk under a vine trellis … or it could just be planted with vegetables so that it becomes a vegetable garden for the whole cluster.
10. A PLACE AROUND A TREE
Trees are very important centers of the common land. A place around a tree can be a pleasant, cool spot to sit during the day when the sun's heat is very strong. For such an area to feel nice it has to be protected with a house or garden wall from at least one side, possibly from where the wind blows and given some glimpses to the view through the view terrace and/or through some passages leading out of the common land.
11. THE ENTRANCE OF THE MAIN PATH TO THE HOUSE CLUSTER
The place where the path enters the house cluster may be marked by a narrowing of the path. It is necessary for it to be defined clearly on both edges by the walls of the houses, or their gardens, or lower walls.
12. SMALLER PATHS
If a smaller path is needed that has not already been defined, it is necessary to define it now. It may provide access from the main path to your site, or it might lead beside your house to another house cluster, or to a special spot in the land outside your cluster, or it may be a path leading to one of the centers within the common land of your cluster.
13. HOUSE VOLUME
Now that you know the approximate position of your house with respect to the garden, the common land and the main oath, it is time to decide just how your house will fit onto the land. Think of your house as being composed of one or more simple rectangular blocks, depending on the configuration of the site. You have to shape and place them in such a way that they create a nice whole that fits on the site in the best way. In order to do this, you have to do all of the following:
a. Determine the number of blocks. The number of rectangular blocks that your house is composed of depends on the configuration of the site, the slope of the site, and the need for a well-shaped garden. The number of the rectangular blocks that your house will have is not arbitrary. It has to be just what is needed to make your house fit nicely on the site and respect the existing configuration of the land. It is obvious that a flat and simple site asks for a house that has less blocks than a house on a slope.
b. Determine the size of the blocks. If your house has more than one block, one of them must be considerably larger than the others; this will be the main rectangular block of the house and it will act as its main center. In order to achieve this, think of the main block as enclosing at least 50% of the house volume, or as being twice the size of the next small rectangular block, all of them together being 74m2 in area.
c. Determine the relationship of the blocks. The rectangular blocks have to be placed in such a relationship to each other and in such a relationship to the main block, so that they help to form a garden and any other outdoor space that has a nice and pleasant shape, and that it creates no leftover pockets and places around it.
d. Determine the relative levels of the blocks. Every roof of the rectangular blocks you introduce has to be approximately a rectangle—meaning that its four corners can deviate slightly from 90 degrees if the configuration of the site requires it. In case that your house has more than one rectangular block, then every roof of a block has to be on a different level from the other. There are two ways you can accomplish this: either you place the floors of all blocks on the same level, in case your house stands on a flat piece of land, and you differentiate the heights of the blocks, or, you can place the floors of the blocks on different levels, in case your house stands on a slope, and then immediately, even by keeping the same height in all the blocks, you have the roofs of the blocks on different levels.
In order to accomplish this operation successfully, you have, first of all, to establish the level, or the levels on the ground where the floors of the rectangular blocks will be built. Then, you have to visualize the size and shape of the blocks of your house and the way they stand on the land. What you have to visualize and establish first is the main rectangular block of the house, as the main center of the house configuration. Walk around on the site, take your time, close your eyes and try to bring to your eyes a clear picture of what you are trying to do. Only after you feel certain about the configuration and the placement of the main rectangular block, you can start placing the other blocks of your house, if there are any, in relationship to the main block.
After you have done this, place white stakes in every corner of every rectangular block you have introduced. In order to be sure that the total floor area of the rectangles you have staked outdoes not exceed 74 sq. meters, pace carefully the length and the width of each rectangle that is laid out on the ground.
14. GARDEN GATE
In the wall between the common path and your garden, there is a garden gate. This gate is located where it seems for you to be the most natural place to enter your house. This means that this gate has a position towards the center of the village without however coming very soon after you enter the cluster, so that your passing through the common land is substantial and enjoyable.
You have to consider this gate as a center which has to help the common land. If it is somehow hidden, then there must be a short flight of steps or a shorter path leading to the gate, clearly visible and this is going to feel as the center.
15. FRONT ENTRANCE
To enter the house you must go through the garden. Choose a position for this front entrance which follows as naturally as possible, from the position of the garden gate that you have chosen.
Choose a place which will be a natural center that not only helps the house but also makes a nice place around it in the garden.
Now that you have finished with the definition of the basic features of your house and marked all your decisions on the ground, make sure once more that these marks are properly made so that in the next stage, you will always be able to see whatever stake there is on your land, no matter how far from it you are.
If the site is irregular then use some taller stakes for the corner of your house which you may tie with a string so that the outline of your house and garden is very clear to you.
PART III – THE DETAILED LAYOUT OF THE HOUSE
While doing the detailed layout of your house, you can move its outline about one meter in or out, but trying always to remain within the same overall volume that you have already defined.
It is also possible that you may need to have some smaller volumes, no bigger than 2m2 of floor surface, sticking out of the main volume(s). Do that only when you are absolutely positive that this is necessary and meaningful for the space in which it happens.
16. MAIN ROOM
The main room is the most important room, the main center of the house.
Place it on the part of the lot with the best view towards both the garden and the hills, in such a way so that everything else on the lot focuses to it.
It additionally has to be placed in such a location so it can have windows on at least two sides, providing abundant light and orienting it towards the best part of the view.
The main room may have a higher ceiling than the other rooms.
The size of the main room is 1/3 the size of the house.
17. MAIN ROOM CENTER
There is a place in the main room that is the most beautiful and the most pleasant to be. It is the part that will concentrate the main activity of the family room—e.g., the family sitting circle.
This is going to be felt as the main center of the main room.
This center has to be helped by all the smaller centers of the main room including its proper shape.
18. MAIN ROOM WINDOWS
The main room owes its beauty mainly to the view and the light. Windows are therefore some very important smaller centers of it, both by shape and by location. Surround the main center of the family room with generous light and view, which will focus towards it from at least two sides. There may be some windows that are more important centers than the rest of them. Maybe the one towards the most pulling side of the view should be higher or the door leading outdoors should be emphasized with a small window on the top… or in a narrower and darker place, a smaller window would make the feeling of the view more intense.
19. WINDOW ALCOVE
One of the most important smaller centers in the living room is its window alcove.
This is a distinct part of the living room, quiet and private in which some people can be together and feel comfortable and relaxed. This place must have a lower ceiling, some extra enclosure and windows on at least two sides.
20. THE ENTRANCE ROOM
Inside the entrance door, make an entrance room, which is the transition between the outside and the rest of the house. Make this room pleasant in itself, perhaps with its own window or view to other rooms; and make this room help to lead you to the main room.
21. THE KITCHEN
The kitchen will concentrate a considerable part of the activity of the house: it is going to be one of its important centers. Make the kitchen a fairly large room, with pleasant light looking to the garden and/or some more public area like the main path, the common 1 and or a smaller path.
22. KITCHEN TABLE
The kitchen has to be focused around an area where the kitchen table is going to be. This area must be comfortable enough for the whole family to sit there, not only eating but also being there and talking.
This is going to be the main center of the kitchen.
23. WARM WINTER TERRACE
One side, south, southeast or southwest, the family room is extended outdoors to a paved area which is going to be warm in the winter and cool in the summer, with an awning or plants above. This terrace will be protected from the winds by a westerly wall; this wall could be either a wall of the house or the garden wall or, if necessary, a wall built for that purpose.
24. COOL SUMMER WINDROOM
In same parts of the house there is a deep shady balcony opening west from either the main room, or any of the bedrooms or just from a passage. The long side of the balcony opens and the balcony needs shutters to be protected from the west sun. These shutters can also be used to "tune" the breeze, like trimming the sails of a sailboat.
The windroom is a very important center to glue the volume of the house to outdoors.
In a case where there is not enough space, a white room or a distinct part of a room could be the windroom, maybe by using movable windows for the winter and only shutters for the summer.
25. BEDROOMS
Bedrooms will be placed to the ends of the house, in more private areas than the kitchen and the living room.
In them the activity will be less intense: this is why for the whole of the house they will be felt as less important centers than the living room and the kitchen.
Decide at this point which bedroom is for the parents and which is for the children. They may be located at the same end of the house, or they may be at opposite ends.
26. MASTER BEDROOM
In the master bedroom there is an area which is more active than the sleeping area: where sitting, talking or dressing happens. Someplace in there is the main center of the master bedroom. Emphasize this area by focusing the light towards it rather than towards the sleeping area and make sure that it is a nicely shaped and useful space.
27. MASTER BED ALCOVE
A very strong center of the master bedroom is the master bed alcove. It is a well-defined area, somehow enclosed with a slightly lower ceiling and a beautiful window.
This alcove can either be a distinct volume adjacent to the volume of the master bedroom or just a part of it, in which the ceiling lowers and/or where there is some clear definition of the space, maybe by some storage space above the bed or some built-in enclosure.
28. CHILDREN'S PLAYROOM
Children share a large common playroom, with plenty of light connected directly to outdoors, preferably to the warm winter terrace, so that they can go outdoors without having to pass through the family room.
29. CHILDREN'S SLEEPING ALCOVES
Children sleep in alcoves, the size of a bed, opening off the playroom or any other room you feel appropriate—even a passage in the house.
These alcoves may be next to each other or on a right angle position or opposite to each other with a passage in between. These alcoves have a lower ceiling and some more enclosure so that they may act as strong centers in whatever space they are located.
30. BATHROOM, STORAGE, ETC.
Secondary rooms (also closets, etc.), much smaller in size than the main ones, will be squeezed in between the main rooms and work as boundaries to define better the larger centers of the house.
31. INTERIOR STAIRCASE
In case two rooms are on different levels, there is a small staircase connecting them.
This staircase, if it exists, has to be considered as one of the important centers for each room it connects.
32. OUTDOOR UTILITY AREA
Outside the kitchen there is a paved area for outdoor work. Depending on where the kitchen is located in the house volume, this area can be in the garden or someplace outdoors in the back of the house.
Choose its shape and size carefully so that it becomes a center and connects the inside to the outside.
33. KITCHEN DOOR
There is a door connecting the kitchen to outdoors. In case this access to outdoors happens to be in the garden, make sure that this door, both by shape and location, is distinct from the front entrance of the house which has to be clearly felt as a stronger center.
34. EXTERIOR STAIRCASE
There is a staircase leading from the garden to the roof, which will provide access to the second floor in case a second floor is built later. Make this staircase a beautiful center, but try to keep it as much a part of the house as possible.
At this point, before continuing with the smaller details of your house, go back to the beginning and mark the corners of all the main rooms, gardens, and other outdoor places within your site and in the common land, with WHITE STAKES. Do it step-by-step in the same order that you placed the red stakes. This is the time to adjust the size of the rooms exactly, and to get each room to have exactly the size and shape you want. BUT, YOU MUST REMAIN WITHIN THE LIMIT OF 74 SQUARE METERS. In order to be sure that you have not exceeded the 74 square meter floor area, pace it or measure it carefully.
When you finish putting in the white stakes, go on to the rules that follow this page.
35. ROOF TERRACE
One of the roofs of the house is a usable space, having a parapet and looking out towards the most beautiful direction. The other roofs are places where building additions on the second storey can be built.
36. GARDEN WALL
The garden wall is the last boundary of your house towards the common land.
It is between 1,40–1,70 m. high. Its thickness and height and also the smaller centers on it will contribute in making it a beautiful boundary helping the major centers of the house and garden and of the common land.
31. GARDEN FENCE
You may feel that a massive wall all around your garden makes your garden feel too enclosed.
In this case, replace the garden wall with a lower wall along which plaster posts are standing up with some kind of iron or wooden fence in between, preferably lower than them… or maybe you could have a fairly high wall with some iron work on the top and/or some plants growing.
38. ENTRANCE GATEWAY
There is an entrance gateway at such a location on the garden wall where it is the most appropriate place to enter your house. You have already defined this point In the first stage of the design of your house.
Now shape this gateway more precisely with an ornamented door—an arched top that rises above the garden wall. Look way with center not only as helping the garden wall, but also as apart of a series of centers that mark the passing from the more public areas—common land, path—to the more private ones—house, garden…
39. ENTRANCE STEPS
If the garden and the common land are not on the same level, connect them with a couple of steps, wide enough for a person to sit there looking into the common land, or talking to the neighbors. These steps emphasize the boundary of the garden on the ground level and also act as a smaller center helping the garden gateway.
40. STONE PATH
There is a stone path connecting the garden to the common land. It acts as a center which connects the gateway to the centers of the common land making the flow towards the house "easier". Make this path relaxed and comfortable, and as much as possible part of the ground of the common land.
41. FLOWER TRELLIS
The top boundary of the garden wall is formed at some places by a small trellis on which sweet-smelling flowers grow. This center acts as a light boundary connecting the heavy mass of the garden wall to the air.
Now that you have completed the designing of your house, look at all the centers that you have created in both the common land and your house and garden and try to see how these centers could be embellished.
You may have such an idea right now, after you have designed your house or you may have it later after your house is built or even later after the whole cluster is completed and you have lived there for a long time. At any of these points you may just have a strong feeling that something is needed, perhaps next to your house, perhaps far from it.
There is a number of smaller centers that are suggested here and, of course, there may be more that you will think of later. Have a look through the following list and see what could happen next to your house. Of course, in this case also, you have to remember to create one center at a time so that the existing center(s) helps you in creating the new ones.
It is, finally, very important to remember that everything you design or build for the common land—a bench outside your house, seats in the center of the cluster or a gateway leading into it, have to be connected, forming all together an integral whole.
This means that those things are placed and shaped in such away that they glue the space of the common land into a comfortable whole, which is nice and friendly, almost like a room outside your house—so that you somehow feel that this space belongs to you.
42. CLUSTER ENTRANCE GATEWAY
The entrance of the path to the house cluster cap be marked with a gateway.
A gateway could be either an arch spanning between two buildings or a pair of stone or concrete columns on either side of the path or a flight of steps where the path goes through some rocks or a seat and low walls marking a widening or a narrowing of the main path.
43. SEATS AROUND A TREE
In a place around a tree you could build seats so that people can sit there and talk.
44. MAIN PATH STAIRS
On the main path you could build some stairs wherever there is a difference of level.
45. A FOUNTAIN
On a crossing between the main path with a smaller path you could build a fountain at the corner.
46. VIEW TERRACE BALUSTRADE
In the view terrace you could build a balustrade on the downhill side and a wooden bench along it where people could sit, look at the view and talk.
47. OTHER BOUNDARIES
Around a nice flat piece of land you could build a low wall so that this piece is properly defined …maybe at a sitting height and wide enough to be used as a bench.
You can build a low wall like that in every part of the common land or along the main path next to your house where you think that such a boundary would help in revealing its centers.
© Christopher Alexander and The Center for Environmental Structure