
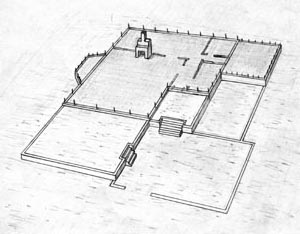
- 1. Site layout
- 2. Build footings
- 3. Build stem walls
- 4. Pour slabs
- 5. Check first floor room layout
- 6. Roughly build terraces
- 7. Build fireplace
- 8. First floor heavy walls
- 9. First floor exterior stud walls
- 10. Ceiling structure
- 11. Second floor
- 12. Third floor exterior stud walls
- 13. Build roofed porches
- 14. Build roof
- 15. Frame partitions
- 16. Locate window openings in stud walls
- 17. Stairways
- 18. Sheathe building
- 19. Design windows and doors
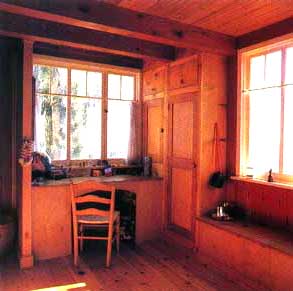
- 20. Finalize layout of kitchen
- 21. Bathroom layout and rough in plumbing
- 22. Roofing and exterior siding
- 23. Place lighting and outlets
- 24. Embellish the exterior
- 25. Insulate house
- 26. Wall and ceiling finishes
- 27. Install built in furniture
- 28. Trim out and interior finish carpentry
- 29. Install plumbing and lighting fixtures
- 30. Build garage and driveway
- 31. Color
- 32. Finishing touches
- 33. Give house to owner
- Return to top ↑
- Home
Dynamic Construction Contract
The main idea of all building that makes beautiful things, is that at each moment, you are making—actually shaping with your own mind and hands—beautiful strong centers, and making positive space. Every part, and every whole, and every part of every part, is done like this. You do it every day, and every hour. It takes years to learn it; but this is the secret of all good building.
Detailed Construction Sequence for a House:
Thirty-three Building Operations
Preamble
We hope to build a beautiful house, together, here on the site. You'll be using our plans as the core, the seed of what you're making. At each operation you'll be taking what's there on the site, and what's in the drawings, and by adjusting a bit, and adding a part of yourself, making it better. Its like carving a piece of wood; if something is not quite right, it may feel "itchy", you may have that feeling that something needs to change a bit in size or position or shape, to be just right. Often small adjustments are enough. We're not asking you to go nuts in changing everything, neither are we asking you to go on auto-pilot, building without thinking and evaluating. Just be alert and aware to the feeling created by what you're building at every stage, and be ready to adjust what you're building if it feels wrong somehow. At each step you should be creating a whole, finishing a beautiful thing. You should even think of something as straightforward as the footings as a beautiful complete thing you've made in the world. And each operation should have some small beautiful detail you add, some beautiful thing, to make it your own, make it more beautiful. At the end of every operation, you should enjoy what you've made, and look around and evaluate the state of things, and think about how to make the house even better, more beautiful, in the operation to come.
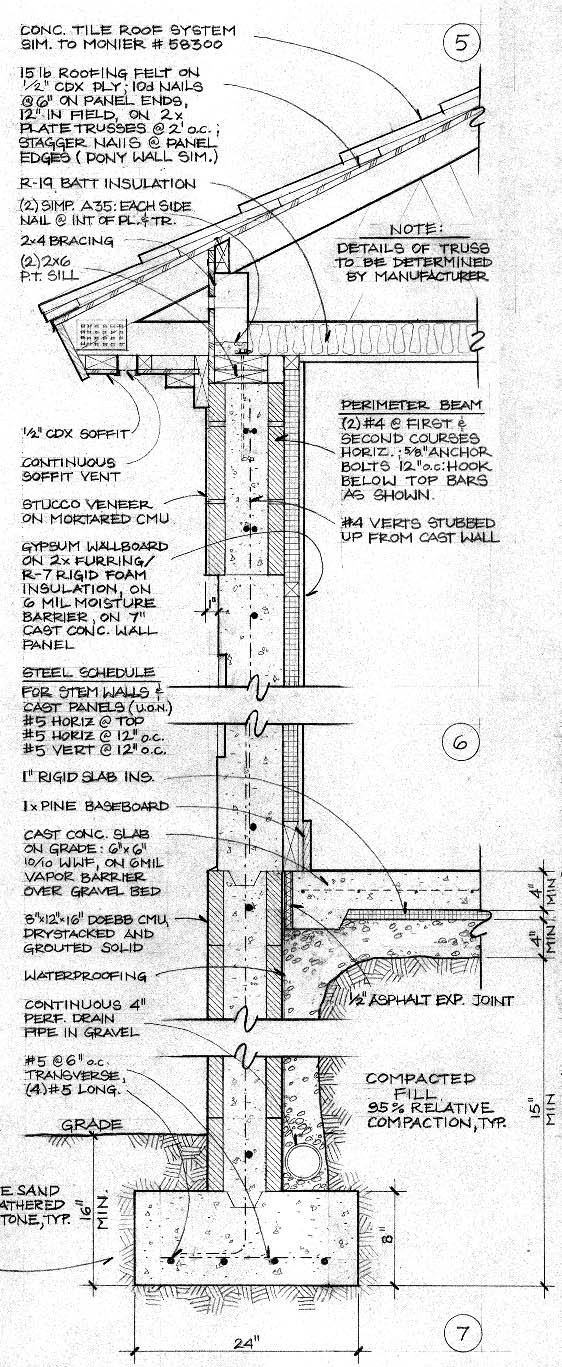
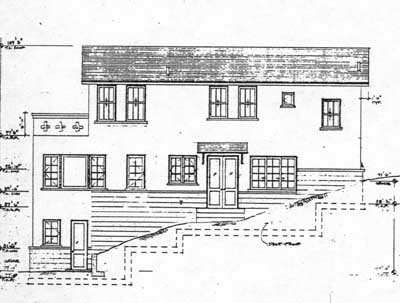
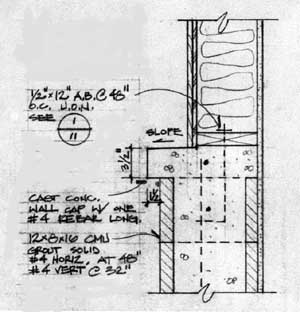
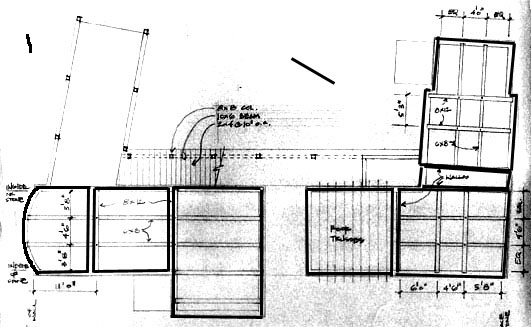
Typical wall section
~ o 0 o ~
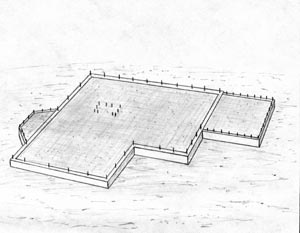
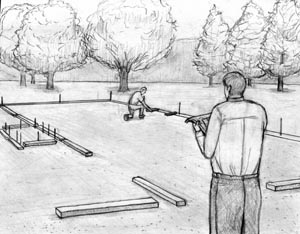
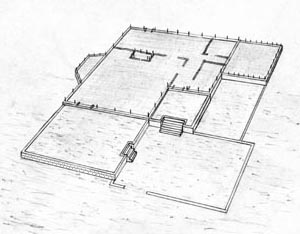
1. Site Layout
The house begins its life here. Although there is a plan-drawing, you will be fine-tuning the position and footprint of the house, thereby adjusting the shape and position of the outdoor spaces around the house, and fine-tuning floor heights.
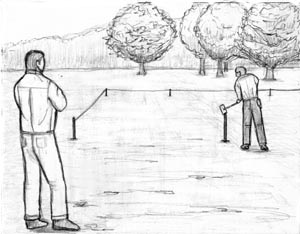
Placing stakes
1. Stake out footprint from drawings. Using stakes and ribbons, lay out the building and its outdoor spaces, and the garage and any other structures, as shown in the plans. Set the ribbons at the height of the first floor as shown in the plans.
2. Check position of house. At this step you are fine-tuning the design you have in the drawings, perhaps on the order of a foot, or maybe even just inches; only rarely is a more major change warranted. Any change in building width or length should be carefully considered, because it will certainly affect the interior layout.
Look at the position on the land; does it seem comfortable when viewed from outside? Are the outdoor spaces about the right size? Check the feeling from the major rooms inside the footprint: looking toward the most important view do you feel you need to be further forward, closer to the view, or the opposite, or is it just about right? You may need to fine tune position and dimension, perhaps on the order of a foot or so either way. Record your adjustments to the footprint in sketch, and set batter boards to record on site.
3. Check location of entrance. Place stakes where the main entrance is shown in the drawings. Approach the house, and walk in and out of the staked-out footprint through this entrance. Does it seem natural to enter the building there? If it seems slightly off, try shifting it a bit side to side, or changing the width, until it seems more natural. Very occasionally a bigger change is warranted, but keep in mind any large change will strongly affect the interior plan.
4. Check floor levels. Having the floor level just right in a room makes a big difference in whether it's comfortable or not. Sometimes a house will have several different floor levels, in different parts of the house. In each part of the house, stand on a stack of blocks or wood at the finish floor height shown in the plans. By adding or removing thickness from your stack, raise and lower the floor level until it feels comfortable. Check the view you get at that level. Do you feel high enough, or do you perhaps feel too high, too separate from the ground level outside? Keep in mind even a small adjustment of an inch or two will have an effect. If you do wish to adjust the floor height from that shown in the plans, put your ribbons at the proposed floor level and check from outside too, to make sure it's ok from there. Carefully record these heights, and mark on batter boards so that string lines can be run at that height.

5. Quick check room layout. Do a quick check of the room layout within the building footprint. Stake out the interior walls with surveyor's ribbon to make sure no major problems have been created. Check if each room is nice, comfortable in its position relative to the site. You won't need to change anything right now, unless you have a strong feeling the perimeter needs to be changed in order to make one of the rooms right. Basically at this point, you should just begin to think about and understand the quality of each room, and how each room feels in its relation to the site, and the other rooms.
6. Check fireplace location. Stake out the fireplace as shown in the drawings, and check how it feels in the room. You might adjust the position side to side, and front to back. You might even move it to another part of the room. If you do contemplate moving it, keep in mind the size and shape of the room, how people might sit around it, and whether they would sit there in the daytime too. Do they have a view from that spot? Does the room work all right in daytime, with no fire?
7. Rough check on position and extent of second story. You should start with the design as originally drawn, but it may need to be adjusted. Place posts and ribbon, up to the height of the top of the second story. How does it feel in terms of position and extent? Does it cover the entirety of the first floor, or does it step back in places, for example to make 2nd story balconies? How much does it step back? You may need to adjust this a bit. Perhaps even a more major change is called for, but this is rarely true. We have found a bit of adjustment here is usually enough. You'll have a chance to fine tune later, but if at this point you see that a big adjustment is needed, it may have structural implications, so begin thinking about it and preparing now.
At the end of site layout, and every other operation, you should be conscious that you're completing a beautiful thing, and you should always be assessing what you've just done. As you complete each operation, you're completing a whole that is that operation, and you're adding to and developing the whole that is the entire house, as it is at that moment. You should step back and evaluate whether what you're contemplating building at this step is really beautiful, or if it needs to be adjusted to be beautiful. Often small adjustments are enough. We're not asking you to go nuts in changing everything, neither are we asking you to go on auto-pilot, building without thinking and evaluating. Just be alert and aware to the feeling created by what you're building, and be ready to adjust what you're building if it feels wrong somehow.
NOW GO TO REPORT MODULE BEFORE CONTINUING. If, based on the stakes and ribbons you've set, you think there ought to be adjustments in the perimeter, floor heights, or fireplace location, report on the changes you propose and what adjustments you'll make make to the line item budget to keep the total budget fixed.
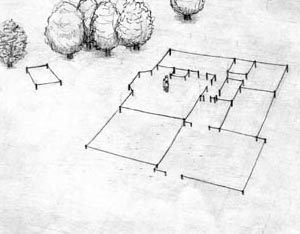
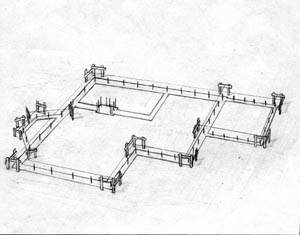
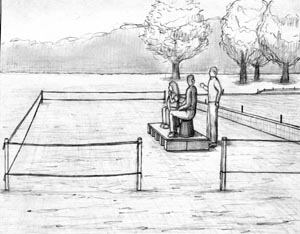
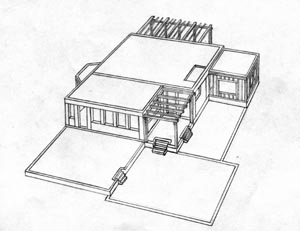
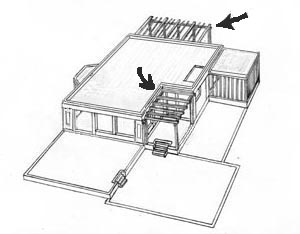
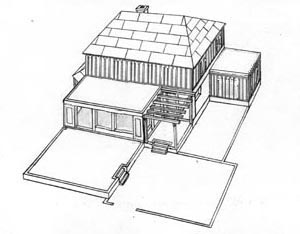
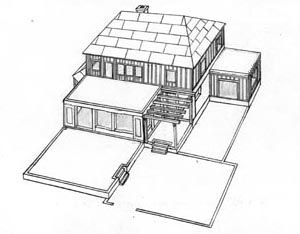
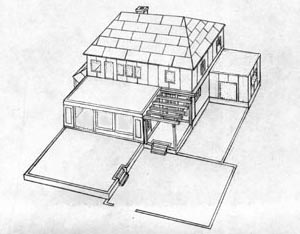
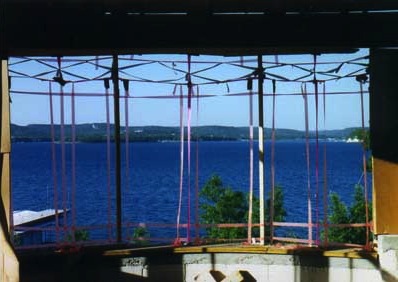
This is what it looks like when "SITE LAYOUT" is finished
~ o 0 o ~
2. Build Footings
Now you begin creating the actual material of the house, according to the decisions you made in Operation 1. No design decisions need to be made here.
Pouring footings
1. Excavate for slabs, trench footings and fireplace footing. Excavate for slabs, based on the finish floor heights determined in Operation 1 above. Trench for wall footings, 24" wide for block wall footings, 16" wide for stud walls. Continue excavation until 6" minimum into solid material, at a minimum of 16" below finish grade. Excavate fireplace footing. Your excavations may be at different heights in different parts of the house, based on site slopes and whether you set varying floor levels in the house.
Hint: when you size the fireplace footing, be very generous: it will give you more leeway later to fine-tune the size and location of the fireplace, without going beyond the footing.
2. Set exact height of top of footing, to get floor heights to come out right.The slabs are at the same height as the top of the drystack masonry stem wall. In order to get this height to come out right, the top of footing must be a multiple of 7 5/8" down from that height, plus the thickness of finish floor. Measure down from the string line which represents your finish floor height, and find the largest multiple of 7 5/8" (plus thickness of finish floor) that still leaves at least 8 inches for footing thickness. You will pour the footings to this height.
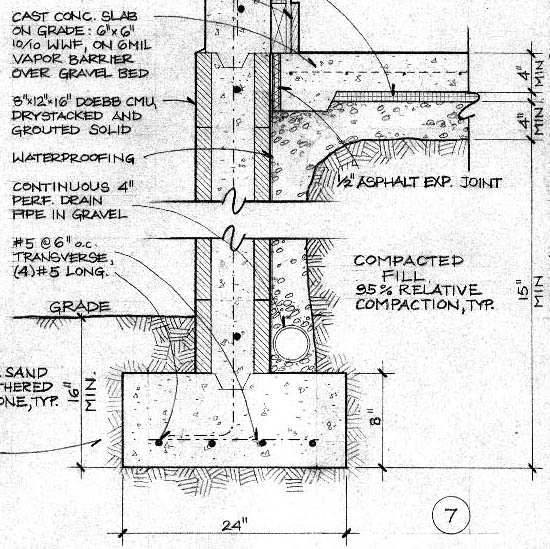
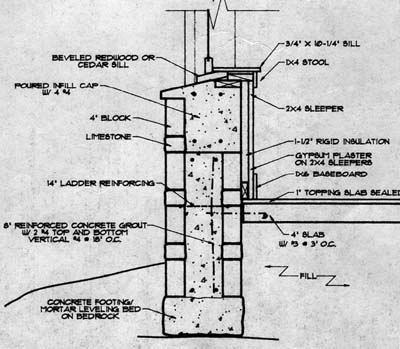
Foundation section
3. Set footing steel and pour footings.
4. Excavate for septic or sewer, and utilities, and place septic system.
Take pleasure in having completed the footings. Even something as straightforward as footings, are actually a whole, a complete thing you've made. Take a look around when you've finished them, and think about the next operation, and what action to take to make the house get even better.
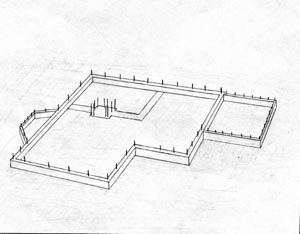
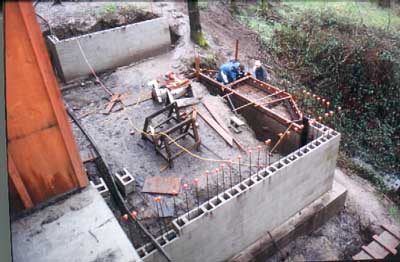
This is what it looks like when "BUILD FOOTINGS" is finished
~ o 0 o ~
3. Build Stem Walls
Here the building will start to rise up from the footings, to the floor levels. You'll be building stem walls in each part of the house, up the level of the floor in that part of the house. Do a final check of floor heights. Add some small special detail, that makes the walls more beautiful, more something your own.
Building stem walls
1. Locate services passing through wall. Set sleeves through stem wall for supply and drain lines, subslab drainage, and other services.
2. Stack block, do a final check of height. Drystack the block, to the heights you determined in Operation 1. You should be always aware and alert to how the house feels at any point, and be ready to propose an adjustment if you think its helpful. Here you have a final opportunity to adjust floor levels. With the walls stacked up, you'll get an even better feel for floor heights than in mockup form. Stand up on top of the walls, and see how it feels if the room is at that height. Because the walls are drystacked, if you get a strong feeling something is wrong you can easily remove or add a course at the last minute. If you're confident its still ok, go on.
3. Make some beautiful small touch of your own. Take this chance to add some beautiful finishing touch of your own to the stem walls, perhaps a little bit of tile set in somewhere, or some other small thing, to make it more your own, and more handmade. You should do this at every step of the way, a little thing each time, it will give life to the house.

4. Grout the walls. Leave the grout a little low in the top course, to allow a key for subsequent pours.
Now that you've completed the stem walls, you should be proud and happy with what you've built. Take this chance to walk around and evaluate what you've done, and think ahead to what might help make the house even more comfortable and beautiful.
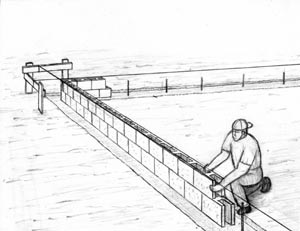
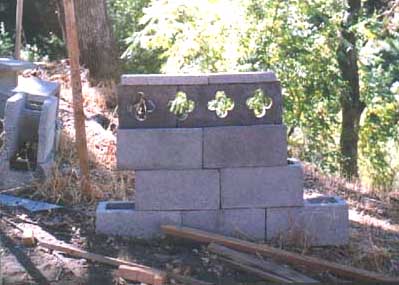
This is what it looks like when "BUILD STEM WALLS" is finished
~ o 0 o ~
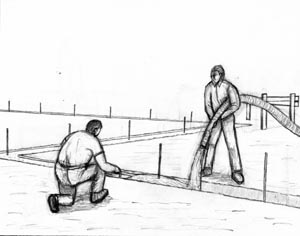
4. Pour Slabs
The slabs will be a key step in the house. You will for the first time be able to walk through the house, and begin to really feel it as a building.

Screeding the slabs
1. Roughly decide locations of plumbing fixtures and plumbing risers to the second floor. For subslab plumbing, now is the time to finalize fixture locations. If you didn't change the footprint or door location significantly in operation 1, you can use the fixture locations as shown in the plans, perhaps with minor adjustments. If you significantly changed things in Operation 1, walk around on the sub-slab and roughly lay out the kitchen and bathrooms and location of plumbing fixtures. Adjust til the rooms make sense and seem comfortable.
(If you make a mistake here and decide to move something later, it is possible to adjust the lines. But definitely make your best effort now to get them right.) Plan out any other subslab services now.
NOW GO TO REPORT MODULE BEFORE CONTINUING. If you have shifted plumbing line locations because you have moved plumbing fixture locations, send a plan outlining what you're proposing, and if the cost is different, include your strategy for keeping the overall cost fixed.
2. Install all necessary subslab plumbing, drainage, heating and reinforcing.
3. Pour slabs. This is an exciting step, a fun day. As you make the slabs, take this opportunity to add some small beautiful touch of your own. Maybe its a small pattern somewhere, or a bit of colored tile or stone, or some such thing.
When you pour the slabs, everyone on the site should join in. Ask the client and their family to pitch in too. It's hard work, start early when the day is cool. Have a party when the slabs are done.
Now that the house is starting to rise up from the footings, take this chance to enjoy what you've built, and walk around, take stock of how the house feels so far, and think what actions in the next couple operations, will make the house even better.
This is what it looks like when "POUR SLABS" is finished
~ o 0 o ~
5. Check First Floor Room Layout
When the slabs have set up, you have your first real opportunity to walk through and check firsthand whether the rooms will work properly as planned.
Marking the outlines of rooms
1. Lay out rooms. Mark the outlines of rooms and partitions with chalk, 2x4's and loose block.
2. Check overall room layout and positions within house. In this stage of the process, you have the opportunity to make corrections to this layout, if you feel that corrections are warranted. Small adjustments are the most likely: you might move an interior door one way or the other, you might move a partition to add 6 inches to one room, and take it from another.
But in rare instances, you might consider a more major change, such as switching the kitchen from one end of the house to the other, or perhaps even eliminating a room altogether. In any change of this magnitude, it must a major discussion with the client, and the client and you must absolutely be of one mind regarding such a major change.
3. Fine-tune room shape. Adjust the location of the walls of the most important rooms first, and most carefully, before moving on to smaller spaces. When you are satisfied that each room and hallway has become the best it can be, record your new layout, in detail, so that this information can be used to direct all further construction.
Step back and take a look at the house as a whole. Is the layout you just made beautiful, an arrangement of rooms that makes you yourself want to live in the house? That's the strength of good feeling you should get from what you've done. If you don't have this strong feeling yet, go back to work on it, try to adjust it til it feels that good. Put a bit of yourself into the layout.
4. Look at exterior materials in mock-up. Incorporate building materials as shown on plans into a large (at least 4'x6') mock-up board. Familiarize yourself with how the materials feel together on the land. If anything seems strongly out of place, mention this in the report module.
NOW GO TO REPORT MODULE BEFORE CONTINUING. If you have adjusted the room layout, record and send in the report module. If the adjustments you are proposing have any impact on the budget, include your proposed budget adjustments for keeping the bottom line fixed.
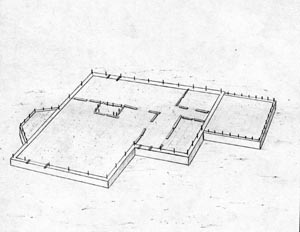
This is what it looks like when "FIRST FLOOR ROOM LAYOUT" is finished
~ o 0 o ~
6. Roughly build terraces
At this point, the building's stem walls and slab are there on the site, and you have established the configuration of the first floor rooms. This gives you a clear enough picture of the emerging whole to begin shaping the outdoor spaces, which surround the house and connect to—and extend—the life of the rooms.
With most houses, this step is left til the end, if it is done at all. This waiting happens in a misguided effort to keep the exterior landscaping work pristine, by doing it last. But you must do it now, in order to really make exterior places that have life, and which are intertwined with the spaces in the house.
In most cases, you should do this step now, at this early juncture. If the terraces seem quite simple, you might wait until after step 9, when you'll have all the first floor walls in place.
Checking terrace height and perimeter
1. First find the main outdoor center, where you want to be when you go outside the house. Walk around the house, and see where you really want to be if you go out in the garden. It may be the main terrace as shown in our plans, or it may not be. It is probably very close to the house, probably connected to one of the main rooms of the house. (Even a very beautiful spot, if far from the house, will not have much activity.) Try sitting in the place you picked. Just use white buckets, or whatever you have at hand, and move the seats around til you find the place and arrangement where you want to be.
2. Identify possible secondary terraces. Look for other places where it is nice to be outdoors. These places will probably be connected to the main terrace, and also perhaps connected to secondary spaces in the house.
3. Establish terrace levels. Start with the main outdoor space you've chosen. By standing on stacks of block, perhaps with a sheet of plywood on top, find a comfortable height for each area of the garden, each terrace. How does it relate to the floor level of the indoor space to which it connects? Its probably a good idea to make the terrace a bit lower, but close. How is the view, the connection to the neighboring land, from that level? Are there any issues of view to the inside from the terrace, for example a high entry terrace may allow a view into a bedroom that wouldn't be comfortable. Adjust these heights until it seems right. (If the desired height seems to be lower than the existing grade rather than higher, try digging out a little area, and stand there, to find out.)
4. Establish terrace boundaries. Now mock up the perimeters of the different outdoor spaces. The main terrace, which you identified above is perhaps the largest. Check the sitting spot you've chosen. Do the boundaries support this sitting group, make it feel more comfortable? Or is the sitting place cramped, or alternatively left swimming in an big empty space. Adjust accordingly. You may need to make the terraces bigger than shown in the drawings, which will cost more money, which will require you to find money in the budget to cover the cost. But don't shy away from doing this, it seems important. Think of it this way: "what would I do if this house were for me and my family?" Thinking of it this way will help you make the right decision.
5. What is the enclosure of the terraces? In addition to any retaining walls needed, decide other enclosures for the terraces. Are there full height garden walls for privacy? Or handrails at 36" or so? Or a wide low sitting wall, perhaps 15" high? Try to see what is appropriate for each space. You won't build these yet, but you should be thinking about these aspects of the terraces.
6. Check materials and engineering of walls. Pick a wall type based on the feel of the place, and a wall thickness and reinforcing schedule, based on the retained height. Often thicker feels better here.
NOW GO TO REPORT MODULE BEFORE CONTINUING. If you're proposing terrace boundaries and levels which are different from those shown on the drawings, report on what you've come up with. If they have budget implications, include your strategy for covering the cost.
7. Excavate footings, and build walls. Build all terrace retaining walls, rails, and other walls as needed.
8. Add drainage, and place backfill. Fill the terraces that require it, bringing them near to the finish level, leaving it enough low to accommodate the thickness of the finished walking surface, to come later.
Now you can walk around, in the main outdoor terraces for the house.
This is what it looks like when "ROUGHLY BUILD TERRACES" is finished
~ o 0 o ~
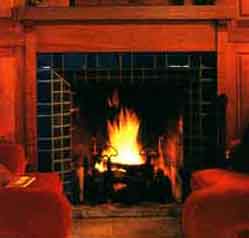
7. Build Fireplace
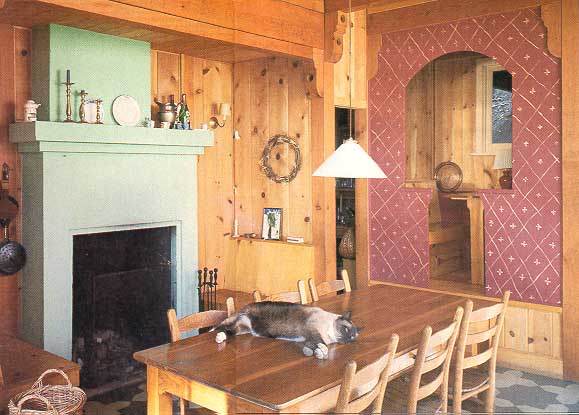

The fireplace gives a heart to the house, and gives a simple pleasure to one's daily life. The configuration and material of the fireplace should suit the room, supporting how and where people would naturally like to sit. Cardboard mockups are a very helpful tool here.
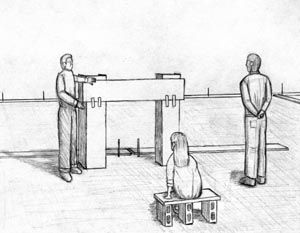
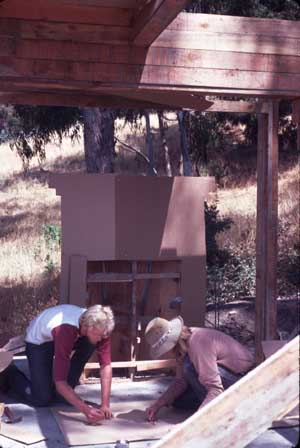
Checking the mantel height by cardboard mockup
1. Get the height of the mantel shelf. Sit down where you might sit around the fireplace. What mantel height feels right? How does it feel if your standing in the room?
2. Define main rectangle of the body of the fireplace. Adjust the shape and size of the main body, trying to make it comfortable and beautiful to sit near. One critical variable is the position, forward and back, in the room.

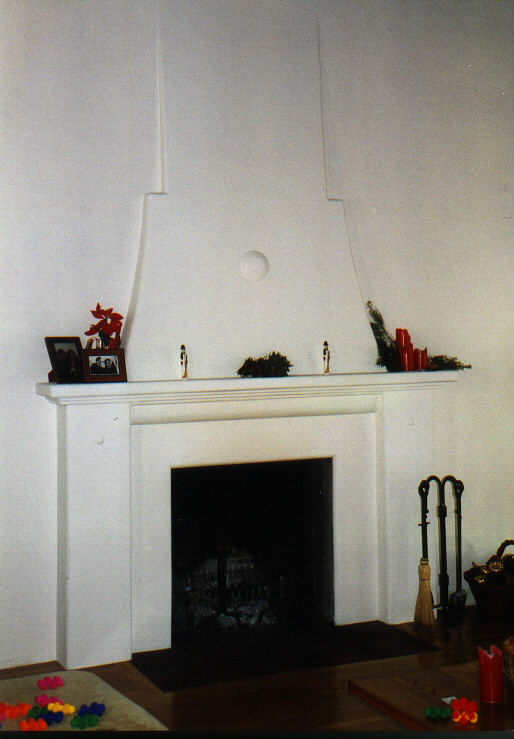
3. Roughly define chimney. The first question to ask here is whether the chimney is visible in the room, or is it hidden in the wall? This decision changes the feel of the fireplace and the room a great deal. Some rooms are really helped by seeing the chimney, while others are harmed by it. Check this by mock up.
4. Is there a raised hearth? Most hearths are at floor level, but some fireplaces have a raised hearth. Try both. If the fireplace is near a place where people tend to sit up higher (for example dining room, or kitchen) you might consider a raised hearth, so that people can see the fire while sitting.
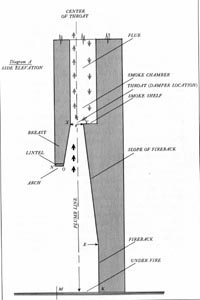
5. Define mouth which makes the whole feel harmonious. Make the opening, the place where the fire sits, comfortable. Adjust the height of the top of the mouth til it feels comfortable, so you can see the fire easily from the places you would sit or stand near the fireplace. This mouth may be quite high to be comfortable; if so consider making a Count Rumford fireplace. See the "The Forgotten Art of Building a Good Fireplace," by Vrest Orton, to learn how to design and build one.

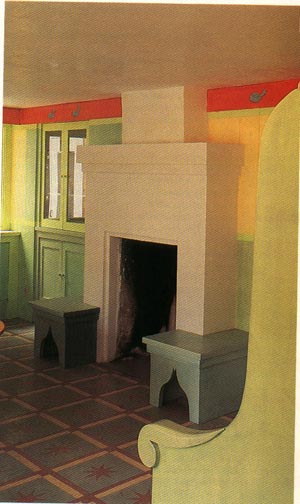
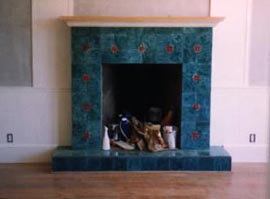
6. Define materials and color of the fireplace. Depending on the feel of the room, the fireplace might want to have a rough feel, or it may want to be more finished, more polished. You should try small material mockups. Some ideas to try: plain concrete, tinted or painted concrete, white cement concrete, brick, plaster, or tile. Or some combination of these.
7. Add finishing touches of ornament. A bit of ornament may bring the fireplace to a beautiful level. Consider ornament at the mantel, or around the mouth, or on the face of the chimney. Be inventive, try handmade things that connect with the owners' life.
NOW GO TO REPORT MODULE BEFORE CONTINUING. Report on the fireplace you've come up with, and include photos of the mockup you've done, and drawings. Also include you strategy for paying for the fireplace, within the fixed overall budget.
8. Drill in to slab and epoxy rebar as needed. If you've stubbed up steel, but it is no longer in the correct place, you'll need to set new bars.
9. Form and pour fireplace, at least up to ceiling level.
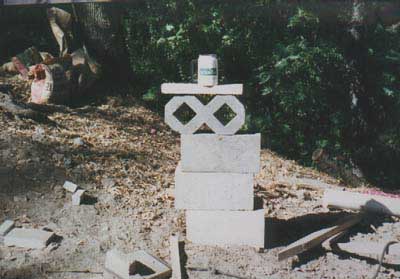
This is what it looks like when "BUILD FIREPLACE" is finished
~ o 0 o ~
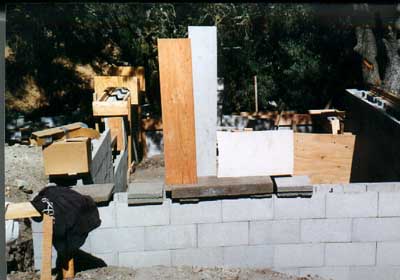
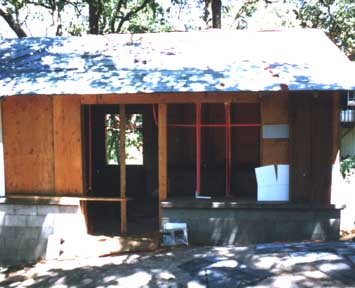
8. First Floor Heavy Walls
This house will gain much of its feeling from these heavy main exterior walls. They will give it a feeling of solidity, permanence, and a handmade quality. Here you'll decide in detail the configuration of the walls, and location, size, and shape of the doors and windows in these walls.

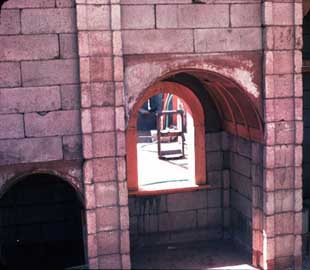
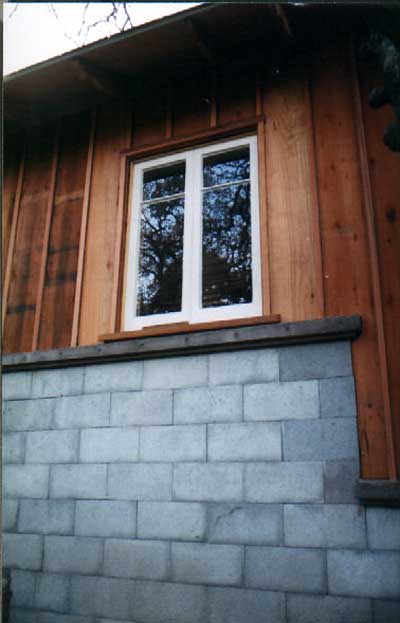
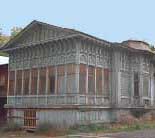

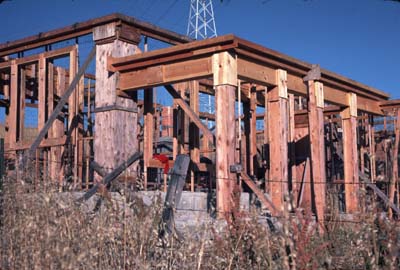
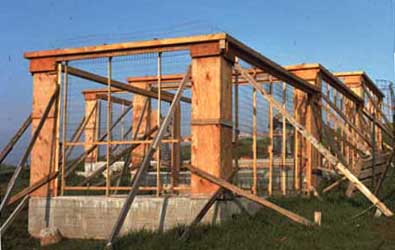
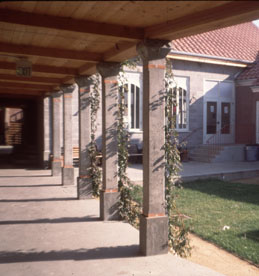
Middle Level Structure in the Heavy Walls
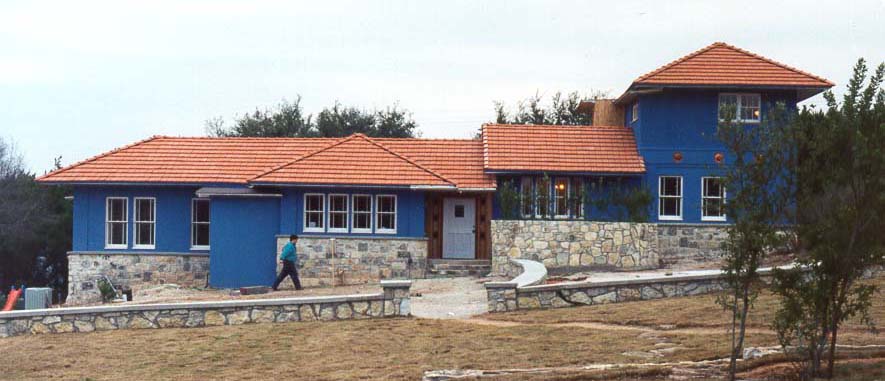
Middle Level Structure in the walls is a key feature of most beautiful buildings. Look at the examples above; in particular the pieces of the wall at the middle level of scale. The columns, beams, bases, capitals, window ledges, concrete blocks, are elements of the structure, beautiful, straightforward, yet ornamental as well. Beautiful buildings nearly always have a beautiful rhythm in the articulation of these middle level elements in the structure. Even the bits of pure ornament, like the concrete frieze in a star pattern or the copper medallions, feel like part of the structure.
In this operation you might choose one of several wall systems for these heavy walls. Each of the wall systems can have this beautiful middle level structure, almost a sort of integral structural ornament, and what it is like, in detail, will be different based on the wall system itself. But it is very important that this middle level of structure exists.
BRANCHING DECISION:
ARE YOU USING CAST CONCRETE WALLS, OR CONCRETE BLOCK WALLS, OR HEAVY STUD WALLS, OR TIMBER POST & BEAM? This will determine the details of the process you will use to plan out the walls, rooms, doors, and windows.
NOTE: If you decide to change from the system that is shown in the drawings for this particular house, you should be very sure about doing so, and the client should be quite sure as well. Making this large shift may require you to have additional engineering done, and the change may well have a time and money cost. We're not trying to discourage you, we're just pointing out that its a big change and only undertake it if you and the client feel strongly that another wall system is really better.
For Cast Concrete Walls, proceed to A below.
For Block Walls, skip down to B below.
For Heavy Stud Walls, skip down to C below.
For Timber Post and Beam Walls, skip down to D below.
A. Cast Concrete Walls
1. Do a final check of the extent of these heavy walls, versus the lighter framed walls. The core part of this house has heavy walls, and the other portions of the house have less expensive stud frame walls. This is because spending money completely consistently, building to the same level of finish everywhere, can lead to an unpleasant sameness. So the core parts of the house, where people will gather and spend time together, have heavier walls, to give a comfortable differentiation to the house, and how it feels to be inside.
Although its unlikely to require adjusting, you should just do a final check to verify the decision as to what is heavy wall and what is lighter stud framing. Walking through the house, do you get a strong feeling for example that a room that in the drawings is given heavy exterior walls really ought to be light stud frame, or vice versa? If so, report this in the report module below.
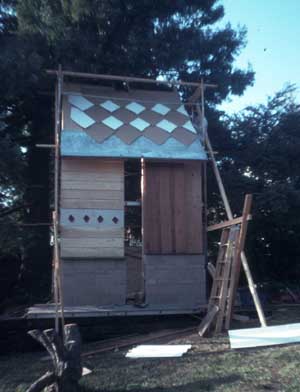
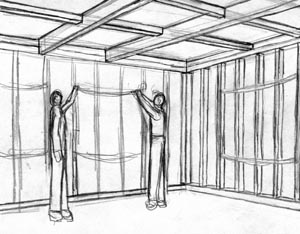
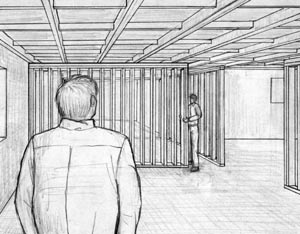
2. Roughly mockup interior partitions. In order to sort out the windows in the concrete walls, you definitely need to have something representing the interior partitions, so that you can feel all four sides of the rooms you're working on. And so build a quick mockup which gives the feeling of the interior partitions; perhaps some sheets of plywood standing up against ladders, or sheets of cardboard stapled to a long board between ladders.
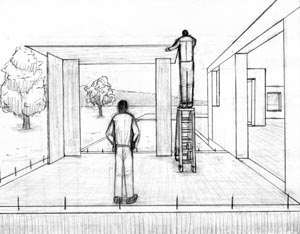
3. Fine-tune wall height. In the largest room, erect a mock-up which allows you to see the intersection of the wall and ceiling. Stand underneath it, and move the ceiling element up and down until it feels right to you--comfortable and beautiful. Be sure to check from outside to make sure it's ok.
Checking ceiling heights and window head heights with a mockup
4. Decide window head heights. In the mockup you've just made, with the ceiling mocked up to the height that seems right, mock up a general height for the tops of windows. Generally, if possible, its helpful if all the windows in a room have the same head height. Try sitting and standing, to see how the views are, and how the room feels. Check from outside.
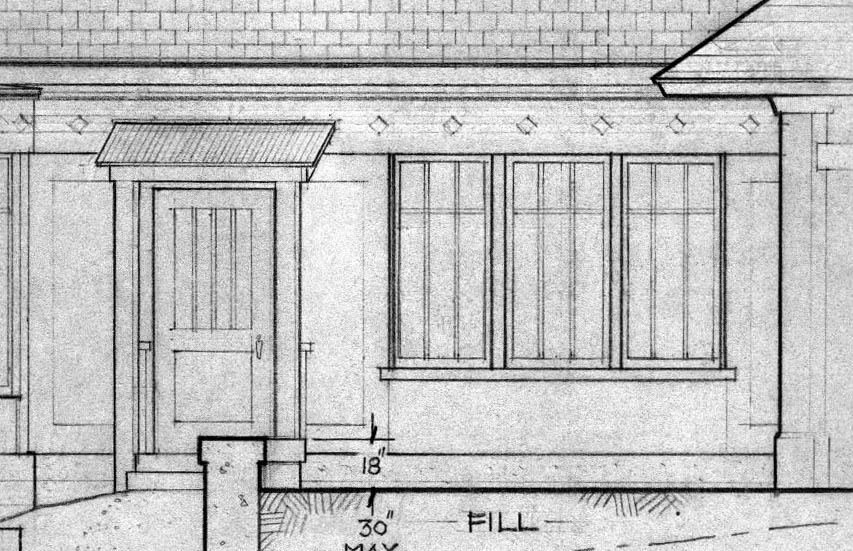
5. Articulated Middle Level Structure. This wall system allows for a great deal of creativity and opportunity for middle level structure and integral ornament. You can make a wall built up of columns, wall panels, and beams. You can further articulate them, perhaps an inset panel in the middle of the wall panels, or bases and capitals for the columns, a row of tiles in the beam, and so on. Try out a few things, perhaps with full size mockups in cardboard. See what brings the building to life, and yet remains calm. In the example below, there's a great deal of middle level structure that really brings the house to life: the wall panels with raised edges, the columns with base and capital, the double stepped beam above the windows, the panel below windows pushed in a few inches, the painted wood sill over the cast concrete sill, tiles cast into the stem wall, star patterned concrete frieze above, column capitals and bases, and so on.
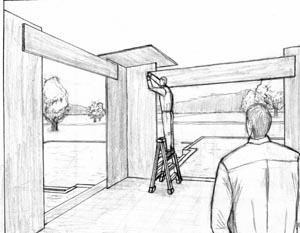
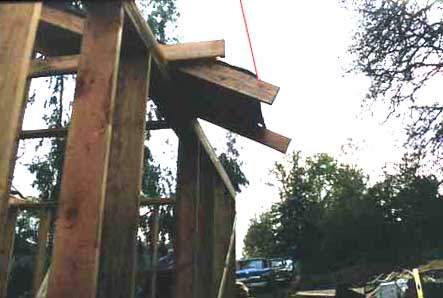
6. Roughly build wall and column forms. Just as a skeleton gives you the structure of the complete animal, the forms will help you tune and adjust the final configuration of the building. Loosely build the forms for columns and wall segments, so that you can move them around, and adjust the length of the wall segments to finetune door and window locations. Since you don't know the final length of wall segments yet you can just build U shaped forms that define the edges for the wall segments; when you finalize the actual length of the wall segments, you'll add sheets of plywood to connect them. (see sketch below).
Using the forms to figure out the rooms, and the middle level structure
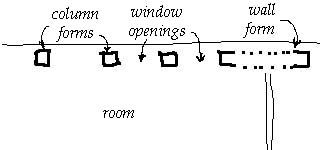
Using the forms to figure out windows in the room
7. Fine-tune windows and walls. Move the forms around, trying out different configurations of windows, columns, and wall segments. Look at each room as a whole, and be sure you have your partition mockups in place. Try to make the room as nice as you can.
When looking at window locations, run ribbon at sill heights, and see how the sills feel. Try sitting near the windows to get the sills just right. Be careful not to put them too high for someone who's sitting down to see out. (See also the Window Location Subroutine, in Operation 16. It's about placing windows in a stud wall, but it has a lot of information that may be quite helpful to you. Come back here when you're done.)
NOTE: Get clear, in your window mockups, what does the mock up opening represent. It probably represents edge of concrete. But keep in mind the glass area will be significantly smaller. With this in mind, if the windows seem too small, consider increasing the opening slightly. (A good rule of thumb for the difference between edge of concrete and edge of glass is about 4 inches.) Be sure to verify with the actual type of window you plan to use.
NOW GO TO REPORT MODULE BEFORE CONTINUING. Report on the Concrete Wall configuration you've come up with, including: wall height, window locations and sizes, ornament, and other details you come up with. If the cost varies from the original line item budget, include your strategy for keeping the overall bottom line fixed.
8. Set steel, finalize panel forms, and pour panels. Include in the form any ornament you've decided to use.
9. Form and cast spandrels under windows.
10. Finalize column forms on top of spandrels, set steel, and pour columns. Include in the form the shape of the base and capital if you have one.
11. Set centering for beams, and stack and grout lintel beam which goes all around the house. Include any ornament you've decided on.
12. Stucco coat on beam and panels. Place stucco coat, to make panels as you've figured out. Include the ornaments you've come up with in the Ornament Subroutine above.
Now continue on to Operation 9.
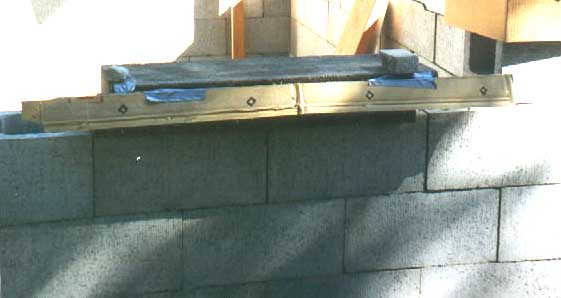
B. Concrete Block Walls

1. Do a final check of the extent of these heavy walls, versus the lighter framed walls. The core part of this house has heavy walls, and the other portions of the house have less expensive stud frame walls. This is because spending money completely consistently, building to the same level of finish everywhere, can lead to an unpleasant sameness. So the core parts of the house, where people will gather and spend time together, have heavier walls, to give a comfortable differentiation to the house, and how it feels to be inside.
Although its unlikely to require adjusting, you should just do a final check to verify the decision as to what is heavy wall and what is lighter stud framing. Walking through the house, do you get a strong feeling for example that a room that in the drawings is given heavy exterior walls really ought to be light stud frame, or vice versa? If so, report this in the report module below.
2. Roughly mockup interior partitions. In order to figure out the window locations and sizes in the concrete walls, you definitely need to have something representing the interior partitions, so that you can feel all four sides of the rooms you're working on. And so build a quick mockup which gives the feeling of the interior partitions; perhaps some sheets of plywood standing up against ladders, or sheets of cardboard stapled to a long board between ladders.
3. Fine-tune wall height. In the largest room, pick two sections of exterior wall, and begin roughly stacking blocks, in a place where a wall panel is shown in the drawings. Stack to the height you think the ceiling ought to be. Run some ribbons or cardboard, to mockup a piece of the ceiling. Check how the room feels. Is the ceiling tall enough for a room of that size? Adjust til it feels comfortable. Check from outside to make sure it's ok from there too.
4. Decide window head heights. In the mockup you've just made, with the ceiling mocked up to the height that seems right, run ribbon or ply or cardboard between the two wall segments to mock up a general height for the tops of windows. Generally, if possible, its helpful if all the windows in a room have the same head height. Try sitting and standing, to see how the views are, and how the room feels. Check from outside.
5. Door and window locations. Now throughout the concrete wall portion of the house, quickly begin stacking block to help you determine location of window and door jambs. Quickly stack up blocks on end, perhaps 3 or 4 blocks tall, enough to really feel the door and window locations. Adjust as seems necessary to make the room comfortable. Run ribbon at sill heights, and see how the sills feel. Try sitting near the windows to get the sills just right. Be careful not to put them too high for someone who's sitting down to see out. See also the Window Location Subroutine, in operation 16. It's about placing windows in a stud wall, but it has a lot of information that may be quite helpful to you. Come back here when you're done.
NOTE: Get clear, in your window mockups, what does the mock up opening represent. It probably represents edge of concrete. But keep in mind the glass area will be significantly smaller. With this in mind, if the windows seem too small, consider increasing the opening slightly. (A good rule of thumb for the difference between edge of concrete and edge of glass is about 4 inches.) Be sure to verify with the actual type of window you plan to use.
6. Middle Level Structure. Consider articulating the wall with engaged columns, or panels that come forward, with the panels below windows further back, and so on. You may want to make some sort of detail in the wall panels, columns, and beams. As the photo above shows, you can build up a stucco border on each wall panel segment, you can put a thin slurry coat of cement paint on the blocks within this border, form bases and capitals for the columns, a row of insets row of tiles in the beam, and so on. Try out a few things, perhaps with full size mockups in cardboard. See what brings the building to life, and yet remains calm.
NOW GO TO REPORT MODULE BEFORE CONTINUING. Report on the Block Wall configuration you've come up with, including: wall height, window locations and sizes, ornament, and other details you come up with. If the cost varies from the original line item budget, include your strategy for keeping the overall bottom line fixed.
7. Finally dry-stack blocks for wall panels up to window head, set steel, and grout.
8. Form and cast spandrels under windows.
9. Finalize column forms on top of spandrels, set steel, and pour columns. Include in the form the shape of the base and capital if you have one.
10. Set centering for beams, and stack and grout lintel beam which goes all around the house. Include any ornament you've come up with.
11. Finishes: Stucco Coat on beam and panels. Place stucco coat, to make panels as you've figured out. Set any ornament in the beam you've come up with.


Now continue on to Operation 9.
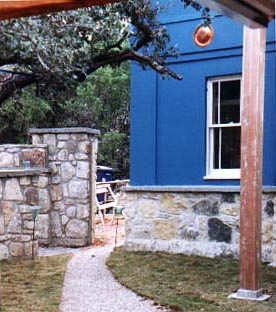
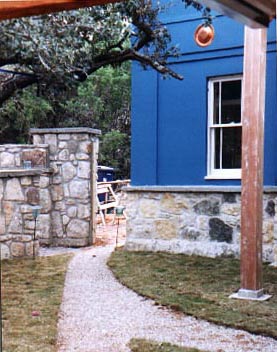
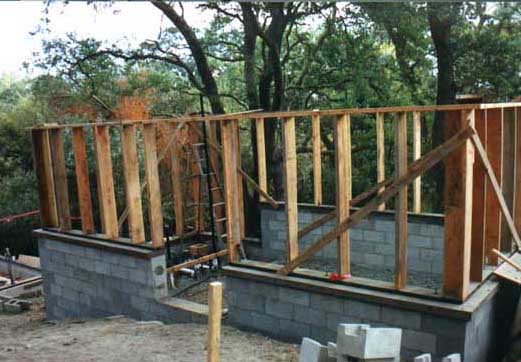
C. Heavy Stud Walls with Stucco

1. Do a final check of the extent of the heavy walls, versus the lighter framed walls. The core part of this house has heavy walls, and the other portions of the house have less expensive stud frame walls. This is because spending money completely consistently, building to the same level of finish everywhere, can lead to an unpleasant sameness. So the core parts of the house, where people will gather and spend time together, have heavier walls, to give a comfortable differentiation to the house, and how it feels to be inside.
Although its unlikely to require adjusting, you should just do a final check to verify the decision as to what is heavy wall and what is lighter stud framing. Walking through the house, do you get a strong feeling for example that a room that in the drawings is given heavy exterior walls really ought to be light stud frame, or vice versa? If so, report this in the report module below.
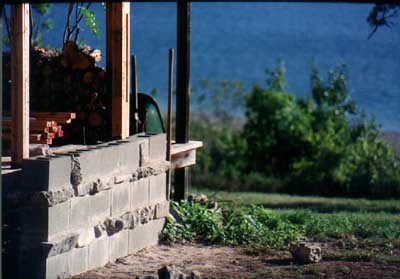
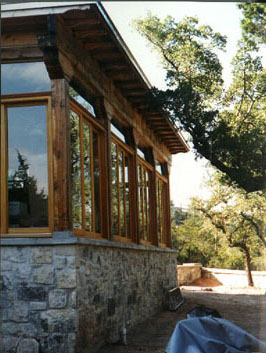
2. Mock up Stem walls above slab. In this system, the stem walls come up further, above the slabs. In the examples shown you can see stem walls made of stone, and of block, and also a mixture of stone and block.
Mock up a stem wall height by quickly stacking block on top of the existing stem wall. What height feels appropriate? Keep in mind that the windows will be above this wall, and even if the windows are set right on top of the stem wall the vertical difference between the top of masonry and where the glass begins is about 6 inches or so. So be sure to check possible window sill heights, while sitting down in the rooms. When in doubt, leave the stem wall a bit low. Check the proposed stem wall height from the outside too. You'll also probably want to have a cap on top of the wall, cast in concrete.
A little touch that you add: You can take this opportunity to make ornament, by tinting this cap, or casting a pattern into it on the front side, or casting little bits of tile into it, or stamping or scribing a pattern into its top. Come up with some beautiful elaboration like this.
NOW GO TO REPORT MODULE BEFORE CONTINUING. Report on Stem Wall Height and Detail. If the cost varies from the original line item budget, include your strategy for keeping the overall bottom line fixed.
3. Build Stem walls. Leave gaps where exterior doors pass through.
4. Mock up interior partitions. In order to sort out the windows in the concrete walls, you definitely need to have something representing the interior partitions, so that you can feel all four sides of the rooms you're working on. And so build a quick mockup which gives the feeling of the interior partitions; perhaps some sheets of plywood standing up against ladders, or sheets of cardboard stapled to a long board between ladders.
5. Fine-tune heavy stud wall height. In the largest room, erect a mock-up which allows you to see the intersection of the wall and ceiling. Stand underneath it, and move the ceiling element up and down until it feels right to you--comfortable and beautiful. Be sure to check from outside to make sure it's ok.

Checking ceiling heights in heavy stud wall system, with a masonry stem wall.
NOW GO TO REPORT MODULE BEFORE CONTINUING. Report on Wall Height. If the cost varies from the original line item budget, include your strategy for keeping the overall bottom line fixed.
6. Build Stud walls. Build the stud walls, to the height you've decided on, with no window openings framed in them.
7. Mock up window openings. Go to Window Location Subroutine, in Operation 16. It will tell you how to place windows in a stud wall. Come back here when you're done.
8. Integral Ornament Subroutine: Include ornament in the walls, ornament which grows out of how the walls are made. Integral ornament techniques that are natural with this wall system include: raised panels and beams and ornament to be made in stucco, patterned siding.
NOW GO TO REPORT MODULE BEFORE CONTINUING. Report on Window Locations and Opening Sizes. If the cost varies from the original line item budget, include your strategy for keeping the overall bottom line fixed.
9. Build window openings. Here you will frame the window openings you've figured out. Its just like a remodel; in the already-standing wall, you modify the existing studs as needed, add headers and king and jack studs as needed, and then add rough sills.
Now continue on to Operation 9.
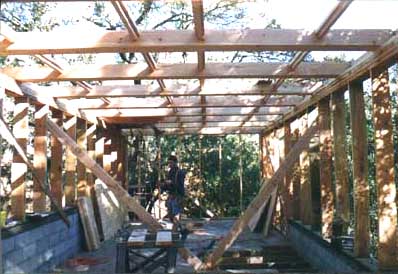
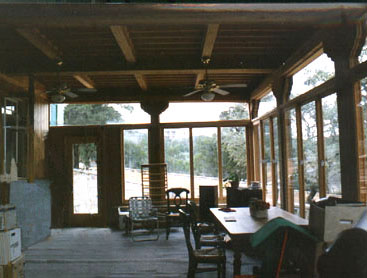
D. Timber Post and Beam
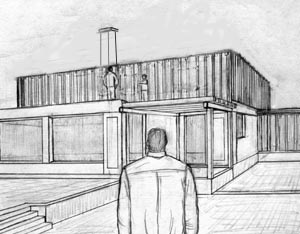
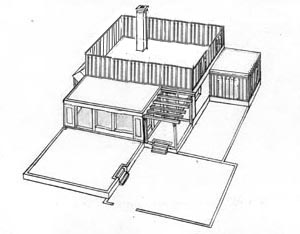
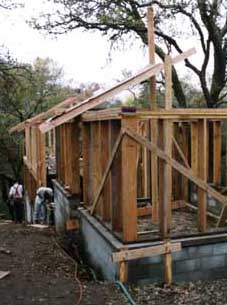
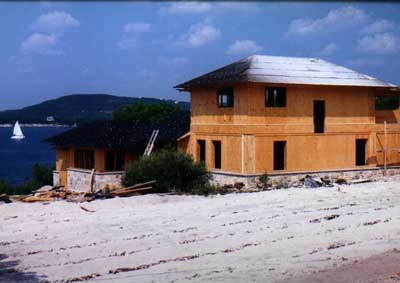
A house built of timber frame
1. Do a final check of the extent of these heavy walls, versus the lighter framed walls. The core part of this house has heavy walls, and the other portions of the house have less expensive stud frame walls. This is because spending money completely consistently, building to the same level of finish everywhere, can lead to an unpleasant sameness. So the core parts of the house, where people will gather and spend time together, have heavier walls, to give a comfortable differentiation to the house, and how it feels to be inside.
Although its unlikely to require adjusting, you should just do a final check to verify the decision as to what is heavy wall and what is lighter stud framing. Walking through the house, do you get a strong feeling for example that a room that in the drawings is given heavy exterior walls really ought to be light stud frame, or vice versa? If so, report this in the report module below.
2. Mockup partitions. In order to sort out the windows in these walls, you definitely need to have something representing the partitions, so that you can feel all four sides of the rooms you're working on. And so build a quick mockup which gives the feeling of the partition; perhaps some sheets of plywood standing up against ladders, or sheets of cardboard stapled to a long board between ladders.
3. Fine-tune wall height. In the largest room, erect a mock-up which allows you to see the intersection of the wall and ceiling. Stand underneath it, and move the ceiling element up and down until it feels right to you--comfortable and beautiful. Be sure to check from outside to make sure it's ok.
4. Fine-tune column locations and beam layout. Can you now make a simple syncopated grid to serve as the structural grid of the house?
Make structural bays each of which is a center, in its own right. They do not all need to be equal in dimension, but they should be parallel. The asymmetrical grid will be the pattern of the house. The grid should define and support rooms; columns should commonly be located at the corners of rooms.
If any room is to have visible beams, try to imagine, as if you were standing in the room, a beautiful pattern of beams which will make a nice ceiling. Make each ceiling a positive center with a beautiful design.
5. Adjust member sizes. Of course columns and beams have to be of a sufficient size and strength to carry the loads on them, but within that criterion, you have the latitude to choose member sizes that feel right, that feel comfortable to be close to. In choosing column sizes, you should stand up a piece of wood or a cardboard mockup, and check its size in the actual place. Is it beautiful and pleasant to be near? Or does it feel too spidery and thin, or too beefy? Adjust til its comfortable. Keep in mind, columns are typically square, but you might consider columns of a different shape, for example 6 x 8s. Beams are typically deeper than they are wide, but in certain situations a flat wide beam is more appropriate.
NOW GO TO REPORT MODULE BEFORE CONTINUING. Report on Wall Height, Column and Beam Layout, and Member Sizes. If the cost varies from the original line item budget, include your strategy for keeping the overall bottom line fixed.
6. Build Frame.
7. Build stud infill walls between columns.
8. Mockup windows. Go to Window Location Subroutine, in operation 16. It will tell you how to place windows. Come back here when you're done.
NOW GO TO REPORT MODULE BEFORE CONTINUING. Report on Window Locations and Sizes. If the cost varies from the original line item budget, include your strategy for keeping the overall bottom line fixed.
9. Build window openings. Here you will frame the window openings you've figured out. Its just like a remodel; in the already-standing wall, you modify the existing studs as needed, add headers and king and jack studs as needed, and then add rough sills.
Now continue on to Operation 9.
Conclusion to Heavy Walls
This is what it looks like when "FIRST FLOOR HEAVY WALLS" is finished
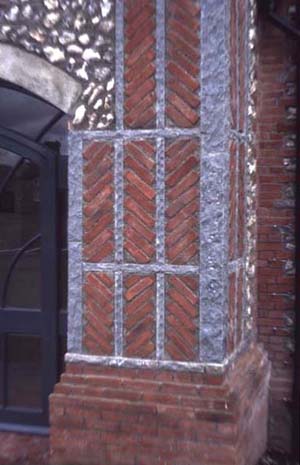
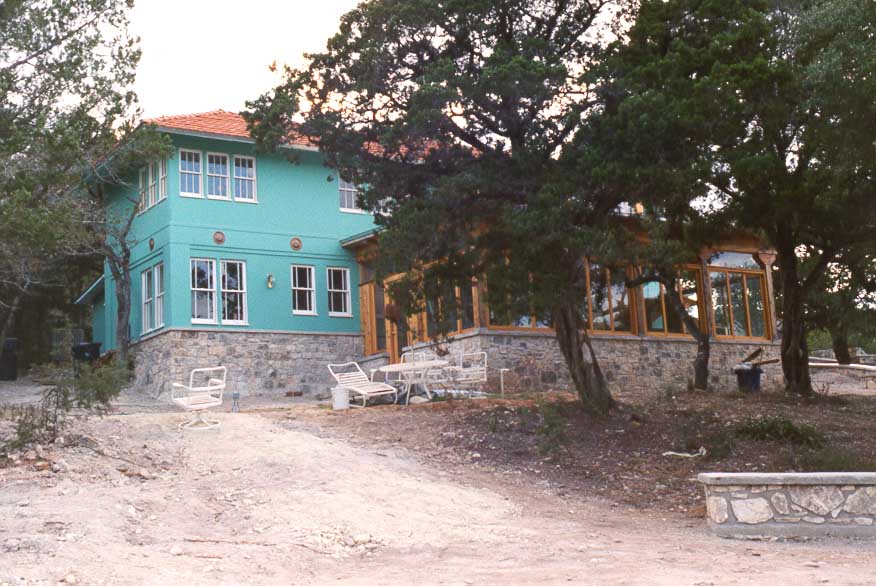
A beautiful example of middle level structure
Now that the main walls of the house are there, take this chance to enjoy what you've built, and walk around, take stock of how the house feels so far, and think what actions in the next couple operations, will make the house even better.
~ o 0 o ~
9. First Floor Exterior Stud Walls
In order to economize on the minor parts of the building, you'll be building the exterior walls in these portions using cheaper stud framing. This allows you more of the wall budget to be allotted to the heavy walls in the main portions of the house.
You'll be building the stud walls, all studs, with no doors or windows framed in them. When you reach operation 16, you'll be designing and placing the rough openings, as if you were remodelling an existing wall.
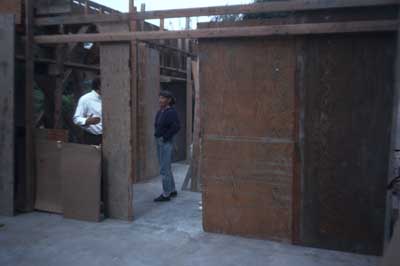
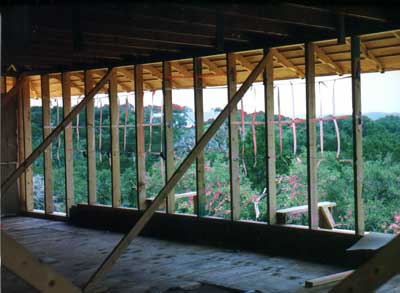
A wall built solid with solid studs—the windows will be framed in later
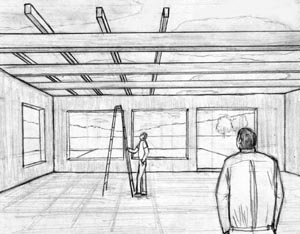
1. Fine-tune wall height. The main thing to determine now is wall height. Other aspects of windows and doors will be settled later, when you can actually stand in the rooms and feel where the views are, where the windows and doors ought to be.
In the wings you've decided to build with stud construction, erect a mock-up which allows you to see the intersection of the wall and ceiling. Stand underneath it, and move the ceiling element up and down until it feels right to you—comfortable and beautiful.
Checking the wall height in mockup
NOW GO TO REPORT MODULE BEFORE CONTINUING. Report on the Wall Height of the Exterior Stud Walls. If there are any cost implications, include your budget strategy.
2. Build and tilt up panels. Frame the walls, with no windows or doors in them. Tilt them up and attach to one another. Plumb and line them. In Operation 16, you'll figure out the window locations, and build the rough openings.
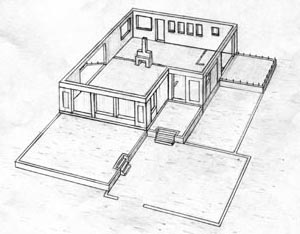
This is what it looks like when "FIRST FLOOR STUD WALLS" is finished
~ o 0 o ~
10. Ceiling Structure
In major rooms, it is often very helpful to have an exposed ceiling structure. The room feels more beautiful, more connected to the material of the house. It can be a series of parallel beams for example, or a rectangular system of major and minor beams, or perhaps a coffered ceiling.
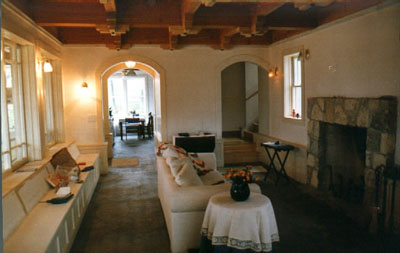
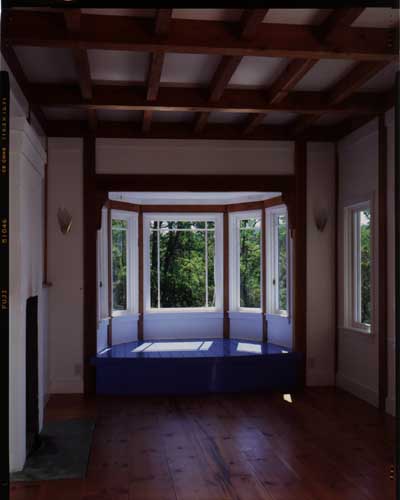
Living room with exposed beams and smaller beams
1. Mock up any exposed ceiling structure, as it is shown in the drawings.
Mocking up the pattern of exposed beams
2. Now adjust the structure and the space together. You should try to fine tune this structure, to make a simple syncopated grid. Each room under this grid should have perceivably whole structure above it, adapted to that room, and yet part of the whole structure. See the example below. Adjust the grid, room by room. Make sure each of the structural bays is a center, in its own right. They do not all need to be equal in dimension, but they should be parallel. Mock-up and shape the structural members so that they feel sturdy and comforting when viewed from beneath. Shape the space between members at the same time, making sure that the areas between beams become noticeable centers of their own.
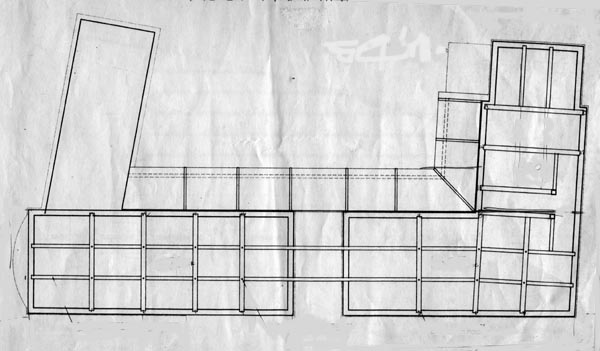
One example: Ceiling beams as originally drawn
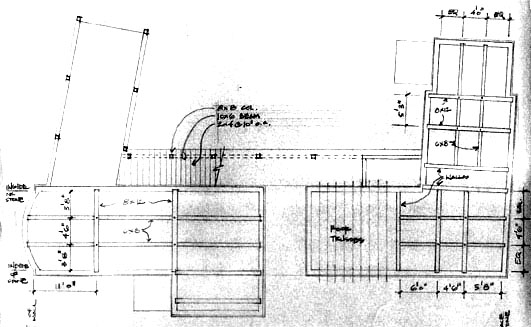
and then as adjusted and actually built on the site. Subtle changes, where the grid is adapted to each space.
With room outlines highlighted: structural grid follows social spaces
3. Plan other simpler ceilings. In smaller rooms, often neither the desire nor the funding for exposed timber structures will exist. If this is the case, assume that each room has a basic sheetrock ceiling, or plaster, or perhaps plywood, on standard 2x joists, perhaps with a painted finish. Keep an eye out for any particular room which requires something more in order to feel right; if so, try to make it happen, keeping a careful eye on the remaining ceiling budget.
NOW GO TO REPORT MODULE BEFORE CONTINUING. Report on the ceiling structures you've come up with. If there is a cost difference compared with the amount currently budgeted, include your budget strategy.
4. Install the ceiling structure. Cut and place the beam structure. Where ever there is a second story. Take this moment to make any last-minute adjustments to the exposed structure, confirming that all the centers are working together. Install 2nd floor ply or boards. If ply will be exposed below, perhaps use a higher grade of ply.

This is what it looks like when "CEILING STRUCTURE" is finished
~ o 0 o ~
11. Second Floor
If the house has a second story, you will now fine-tune its configuration and build it. You will be going back through operations you've used already, but applying them to the second floor.
Building the second story
1. Fine tune position and extent of second story. Now revisit what you did in Operation 1, but fine-tune the position and extent of the second story. You might slightly increase or decrease the size of any second story deck area, by slightly adjusting the position of a second floor exterior wall. At this point large changes are not usually appropriate, and may cause structural issues.
2. Now repeat Operations 8 thru 10 as they apply to the second story. Use the Report Modules and submit reports for each step.
- Heavy Walls
- Exterior Stud Walls
- Ceiling Structure
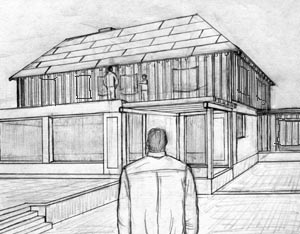
This is what it looks like when "SECOND FLOOR" is finished
~ o 0 o ~
12. Third Floor
If the house has a third floor, repeat operation 11 above, as it applies to the third floor.
~ o 0 o ~
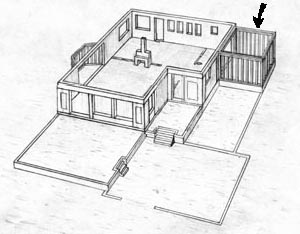
13. Build Roofed Porches
The porches of a house are really like an outdoor room; an incredibly important part of a house. They should be done now, early in the construction process, to make sure they are part of the house, and grow with it and influence the development of the house. They can't be stuck on at the end, and still create a beautiful house.
One thing is very important. Each element of the porch- the columns, the space between columns, the beams, rafters, column capitals, each should be articulated as a beautiful thing, a center in and of itself, and part of the larger whole.

Various porches: each part is a beautiful center
1. Adjust shape and size of porch in plan, and overall height. Mock up the perimeter of the porch as it appears in the plans. You may need to adjust its dimension or position slightly. Can a group of people sit there comfortably? Set out chairs, or buckets. Sit there, relax, talk. Does it feel large enough? Or is it too large to be cozy? Adjust til it feels right.
2. Adjust column shape and spacing: make the columns beautiful things, and make the spaces between beautiful too. Starting with the columns as designed, adjust the column spacing and location so that the spaces between the columns are beautiful, and in harmony with the columns themselves. You may need to slightly adjust column size as you adjust the spaces between, to best create and harmonize with the spaces between.

Beautiful spaces, created by columns which also have good shape

How columns can shape the space between each column, and in the middle between all the columns

Columns carved in place, out of solid stone—you can feel that the space between the columns is the most important thing being shaped
3. Ceiling shape. Fine-tune the ceiling shape, to create a beautiful space in the porch. Again there are several options, the general type as designed is probably right, but need some slight adjustment, for example the pitch may need some adjustment.
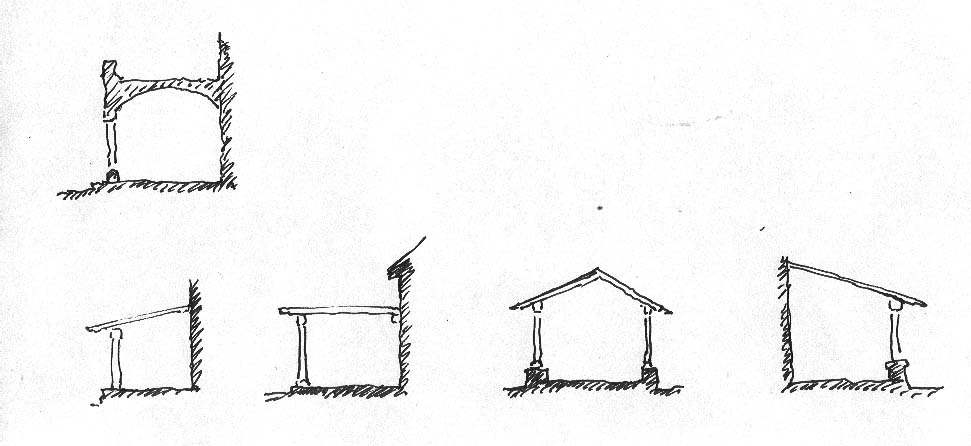
Various ceiling shapes a porch might have
4. Check materials, and adjust. The materials as designed are probably right, but you should check them for yourself, to make sure. Make a mockup, just to feel the materials in combination next to you. There are many choices of materials, and of course you can combine them. For example one of the porches shown above has stone stem walls, concrete wall caps, heavy timber columns and beams, light framing for roof, and heavy steel rods as collar ties. Another has cast concrete columns, heavy timber beams and 2x decking spanning the beams.
5. Make sure each part is a center. Finetune the shape of columns, capitals, bases. Make major beams, and give each of them a beautiful shape. Put the rafters at such a spacing that their shape in cross section, and the spaces between them, form a beautiful harmony. Consider shaping the rafter tails. Add any electric lights needed in places that enhance the structure, rather than detract.

A construction experiment, finding a good shape for a column, its capital and base
6. Check engineering of structure. If you have varied significantly from the porches as designed, you should check the engineering, and make sure everything is still structurally all right.
NOW GO TO REPORT MODULE BEFORE CONTINUING. Report on the Porch ideas you've come up with, including: plan and section, and sketches of columns and beams. If there are any cost implications, include your budget strategy.
7. Excavate and place footings.
8. Construct porch. Install columns, and beams. Install roof sheathing.
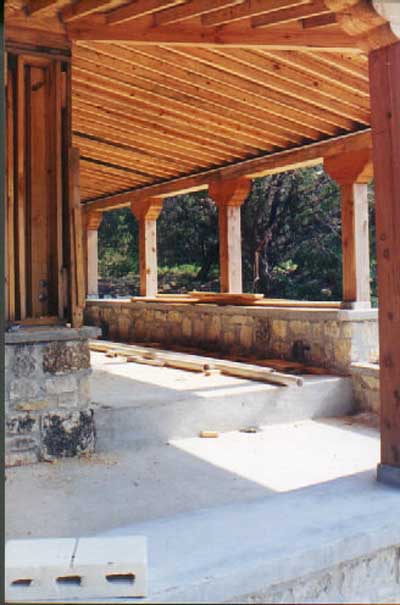
A finished heavy timber porch
This is what it looks like when "BUILD ROOFED PORCHES" is finished
~ o 0 o ~
14. Build Roof
Here you will make a major step in determining the feeling of the house from the outside; the roof is a very important part of the character of the house. Its pitch, overhang, all help make the building feel sheltered, protected.
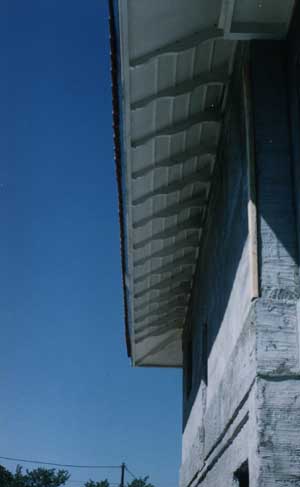
Roof eave with shaped rafters and small purlins
1. Check and adjust roof pitch. You should stand up some posts in the position of the ridge, and run some "rafters" down to the wall plates. Starting with the roof pitch shown in the drawings, adjust the height of the ridge, and thus the roof pitch, until it feels right.
2. Overhang. Adjust the "rafters", to make an overhang. Place some ply or cardboard over these rafters. Move the ply in and out, to make a greater or lesser overhang. How does it feel to stand underneath it? Check from inside, to make sure light inside the house is ok.
3. Fine-tune rafter and soffit detail. Again, start with what is shown in the drawings. But if this doe options you might consider open rafter tails, or a boxed soffit or a moulded cornice, or some other option. Try shaped rafter tails. You can mock them up very quickly in cardboard, making many versions quickly.
4. Fine-tune and adjust. You may need to finetune all of the above, together. One thing to remember: if wings of the building have radically different widths, the roofs may need to be different too, particularly the overhang. Or perhaps very narrow wings of the house may be best with a flat roof.
NOW GO TO REPORT MODULE BEFORE CONTINUING. Report on the Roof slope, overhang, and details you have come up with. If there is a cost change, report on your strategy to cover this.
5. Frame and sheath roof.
This is what it looks like when "BUILD ROOF" is finished
~ o 0 o ~
15. Frame Partitions
The rooms and spaces inside the house will now be defined in their volume when you build the partitions. This is a chance to fine-tune what you determined earlier, in operation 5. Make each room feel the best it can by fine-tuning the partition until its proportions are most alive.
Installing a partition, and fine-tuning placement
1. Lay out the partition plan you worked out in Operation 5. mark the general partition layout on the floor. Use scrap 2x4's, laid out in the position of the plates. Leave gaps for doors.
2. Check major door locations. Fine-tune the location of interior doorways, by walking from room to room, through the gaps you've left in the 2x4's on the floor. Adjust as necessary.
3. Frame the partitions. Frame partitions with door openings, and tilt up into place. Lightly tack in place.
4. Last chance to fine-tune the shape of rooms. If needed, this is your chance to slightly adjust the shape and size of rooms, by slightly shifting the partitions. Adjust the location of the walls of the most important rooms first, and most carefully, before moving on to smaller spaces. Do not permanently secure partitions to roof and floor diaphragms until the partitions for the entire floor have been worked out and are harmonious.
NOW GO TO REPORT MODULE BEFORE CONTINUING. Report on any changes you want to make to the previous partition positions you worked out in Operation 5.
When you are satisfied that each room and hallway has become the best it can be, plumb the partitions, attach them to the roof and floor, and install blocking and nailers where needed.
~ o 0 o ~
16. Locate Window Openings in Stud Walls
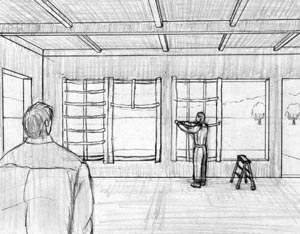
Here you will locate window openings in the framed portions of the house. Rooms with well-placed windows are incredibly pleasant to be in. Here you'll use an innovative technique for locating the windows, which allows you to put them in just the right place.
You have already built the exterior framed walls, with no rough openings. Now you'll settle the location, size and shape of the windows, and build the rough openings.
Installing a partition, and fine-tuning placement
1. Stand in the room and make guesses about the feeling of the room.
- Stand in the room, with walls up, and ceiling framed, so you can see through the walls to the outside. Begin trying to feel the natural centers in the room.
- Ultimately, you want to find a window or set of windows, which make the room as a whole, more center-like, more artistically whole. Whatever glimmering you have of how to do this, keep it at the back of your mind.
- Which is the most beautiful view? How should it best be framed? If you can identify a view which dominates the room, then perhaps establish the beginnings of a center, which makes the most of this view, from some important place inside the room.
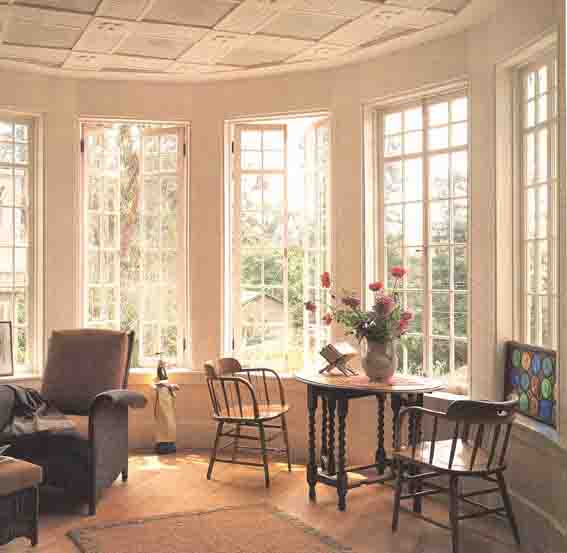
- Is there a place, somewhere in the room, which would benefit from being a "window place"—a seat, table, favorite armchair by a window, which will become a major center in the room? This should not be exaggerated. But even a window, without seat or bay, can be a place, if it is a natural place to sit, have coffee, work…If there is such a place identify it.
- Where should the light come from, ideally. And is there enough light coming into the room? Identify additional directions the daylight should come from.
- Are there windows on two sides of the room, so as to give it a beautiful light? Create a place illuminated from two sides.
- Can you visualize which windows are large, and which are small? Mark those windows which might be main centers for the room.
- Close your eyes and try to imagine all the windows as they may be when you are done. Think of windows and room together as a single complex center.
Placing the opening of each window using surveyor's tape
2. Use surveyor's tape to place openings where you think the windows ought to be, and at the size you think they ought to be.
- Place surveyor's tape (or some equivalent) tacked to the studs, so you can visualize the opening of each window. Carefully form the rectangle of each window that makes it a beautiful center.
- Are the sills where you want them? In most cases they should be at the same height all around the room, unless there is a special reason for one to drop down, or to go high. Consider the zone of the wall below the windows a center which has a nice feel and shape.
- Are the window heads at the height you want them? Typically, in most cases they should be at the same height all around the room, unless there is a special reason for one to drop down or to go high. A comfortable height for window heads is often about 6'8" or 7', the same as the head of the doors. Occasionally window heads can be higher than door heads, to bring extra light. The zone above the window heads is a center too, and needs to have the height which makes the room feel comfortable.
- Place the jambs (vertical edges) of each window with special care, so that the windows are just large enough, and not too large. Place the window edges to form nice centers and positive space in the sections of wall between the windows.
- Does each window have a beautiful shape? Adjust, if necessary, to make each rectangle a beautiful shape in its own right.
- If several windows are side by side, they should be roughly the same width (not exactly may be OK, sometimes, if it is for a good reason.) Groups of windows form centers too, and should be judged to form a beautiful run of windows.
3. Double check and adjust.
- Be in the room. Walk about. Sit down. Check to see whether the comfort of feeling in the room, with the windows sized and placed as the surveyor's tape shows, is as comfortable as you know how. Check the overall feeling of the room as a beautiful center. Any correction you make should stem from this observation.
- If any small improvements need to be made, in position, or dimension, make them now. All this work would focus on the space between windows, and the shapes of the windows themselves as centers. It may also be determined by an improvement in the center that is created in the room, or in the view.
- It is possible that some larger questions of position, or sizing, may need reflection. If you are not sure about any aspect, sleep on it. Come back the next day, and check it again. Do experiments, and test the differences in feeling caused by small differences in geometry.
- If you think there may be something wrong, but you do not want to lose the position of the surveyor's tape as you have it, use another color to put an alternative position, and do not destroy the first position of the tape, until you are sure you want to go to the second. If you have made even one really beautiful center in the room, you have done something good.
4. Look at the windows from outside the building.
- It is important that the windows look right not only from inside, but from outside, too. From outside, have a look. If the current proposed window positions are not visible with the surveyors tape tacked on the inside, put something outside that allows you to judge the same positions and openings. Look at the house as a whole, as a beautiful center,. and try to judge if it is supported (made better), or damaged (made worse) by the position, distribution, shapes and sizes of the windows.
- It is good to do the outside, after you have several rooms done from the inside, so you see the cumulative arrangement and effect of all the windows together, from the outside.
- If necessary, make the windows more regular, so they do not create too disorderly an impact on the outside of the building. By making things more regular you may be adding coherent centers and repetitions which will help the building as a whole.
- Adjust any of the windows, so that from outside the whole has a beautiful quality. Any effect you notice from the outside, which gives the building more life, should be acted upon. It may be a small impulse, but if you follow it, and check it, you will probably not regret it.
- If you do so, go back inside, to make sure that the new positions also look good from the inside of the rooms. If necessary adjust from the inside, and the outside again, until both are good at the same time. In the end you are aiming at windows which do not just "look" good, but which really are good—hence from inside and outside both, because they introduce the right differentiation into the fabric of the house.
Checking from outside
Click Here to see a slideshow of this process being used.
NOW GO TO REPORT MODULE BEFORE CONTINUING. Report on Window Locations. Make drawings of rough opening size and locations. If the number/size of windows varies significantly from those shown in the drawings, which may create a cost increase, include your planned strategy for covering this increase. But don't be discouraged, or skimp on windows in order to save money; a little extra money spent on windows is usually money well-spent.
5. Mark rough openings. First get clear in your own mind, in your ribboned mockups, what does the ribbon represent. It may represent edge of glass. It may represent outer edge of sash. Get clear in your mind which it is. Then add the appropriate dimension to get the rough opening. If it's edge of glass, a good rule of thumb is to add 4 inches to the top and each side, and 5 3/4 inches to the bottom. If your mockup represented sash, add 1 1/2 inches to the top and each side, and 3 inches to the bottom. Be sure to verify this with the actual type of window you plan to use.
6. Frame the windows. Frame these rough openings, as you might do in a remodel job; cut studs, add king studs, jacks, headers and sills as necessary.
This is what it looks like when "LOCATE WINDOW OPENINGS" is finished
~ o 0 o ~
17. Frame in Stairways
The stairways in this house should be a beautiful link between floors—a complete journey—with changes in direction, lighting, views, and possibly resting spots along the way. Do what you can to make this happen, within the existing stair bay.
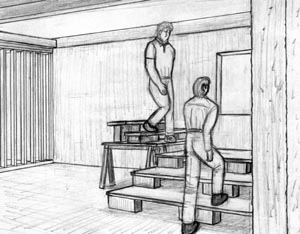
Walking up and down the stairs mockup
1. Plan stair landings and rhythm. Mockup the stairs, as shown in the drawings. Make mockups out of blocks and plywood, so that you can walk up and down the stairs, at least near the bottom, and near the top. Now adjust as you feel needed. Plan out where landings occur. Walk up and down these mock-ups, adjusting them til the rhythm of climbing and descending the stairs feels right. You might consider winders, if they're helpful. Keep in mind what you are looking at when you walk up and down—is it pleasant? Are you looking at something enjoyable as you walk up and down?
NOW GO TO REPORT MODULE BEFORE CONTINUING. Report on the Stair configuration you've come up with. Show a plan sketch. If there are any cost implications, include your strategy for paying for this.
2. Frame stair. At this point, the finish materials of the stair will have started to become apparent to you. Since the structure will vary somewhat with finish materials, plan your framing of the stringers and sub-treads accordingly.
~ o 0 o ~
18. Sheathe Building
This step will make the building more solid, and feel more solid. Its a key step that must be taken, before you can design the windows and doors. No real design decisions are needed.
1. Check shear walls. You've probably moved some windows around, made some larger, some smaller. The shear walls may have been affected. Check them or have an engineer check them, and adjust shear wall designs as needed.
2. Install holddowns as needed. You may need to drill and epoxy in holddown and anchor bolts in some instances.
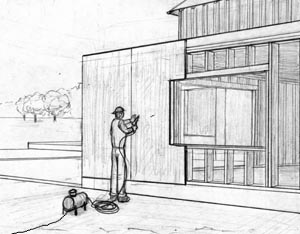
Installing sheathing
3. Sheath the building. Follow the shear wall specs as found in the drawings, as adjusted in step one. Use the general specification elsewhere.
4. Add any further straps and hardware needed.
This is what it looks like when "SHEATHE BUILDING" is finished
~ o 0 o ~
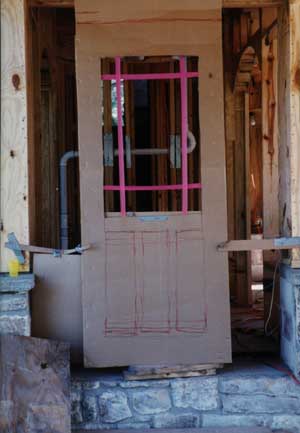
19. Design Windows and Doors
You have already done the first phase of the windows and doors: you've fixed the size and location of the windows, and built the rough openings. Now you'll complete the windows by determining the divisions of the windows into panes.
The windows of the house are where its soul is; their shape, the way they're divided into panes, shape your feeling as you look out from the inside, they shape your feeling as you look at the house from the outside. They are like a person's eyes; they are where you feel the essence of the house. And so the panes and subdivision of the windows should be harmonious with the rooms of the house, and grow naturally from the feeling of the rooms, and of the rough openings. Custom windows are a vital necessity, don't force the house to fit premade windows.
It's very important to do this step AFTER you've sheathed the framing, so that you can really feel the enclosure of the rooms.
1. Look at examples. Most good windows are vertical rectangles, because they are more being-like, and you have more relationship to them. Even when you have a window which is large and horizontal, it is often best to make it up as an assembly of vertical rectangles.
2. Preliminary layout of most important windows. In the major room, find the most important window or group of windows. Work on this first.
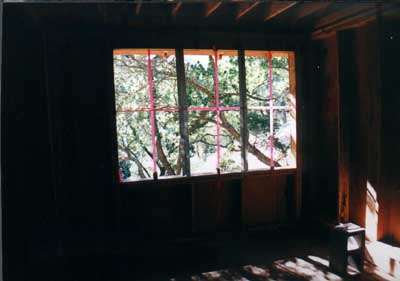
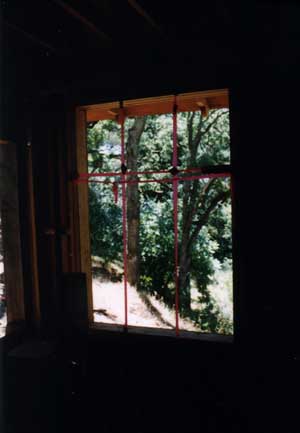
3. Choose subdivision according to the rectangle. Based on the shape of the rectangle which forms the whole of the window, using surveyors ribbon, try different patterns of glazing bars, making different subrectangles (or occasionally other shapes). The smaller rectangles, the panes of glass, should have a harmonious relationship to the larger rectangle, and to the room as a whole.
Checking different patterns of glazing bars
4. Strengthen centers in the subdivision. Adjust the glazing pattern, strengthen the centers formed in the pattern. This may mean adjusting dimensions, simplifying, or adding, or introducing smaller subdivisions.

5. Look at several windows, and choose simplest and most pleasing when repeated. What may seem good for one window, may be too much if repeated in many windows in the room or the whole house. After you've tried a few window designs, try replicating them across the major windows of the room and see how it feels.
6. Make all minor windows lesser versions with less differentiation. Try making the smaller or less important windows, as simplified more basic versions of the major windows. In essence, all the windows of the house should feel that they form a family.
7. Check whole house from outside. The whole house should feel unified, all of a piece, and yet there should be differentiation between major and minor windows. The windows should form a family, all related, the same where the situation is the same, but not forced to be the same if the situation is different.
You might also consider the strategy that one type of window is used on the main floor, and a related but different type is used on the second floor.
8. Record design. You will need to record the designs carefully. Take measured sketches, and take photos. Keep in mind that if your mockup assumed the entire rough opening was glass, you will need to slightly scale down the design, to allow for the width of frame and sash at the edges. To do this, you should definitely do scale drawings, at say 1 1/2"=1 foot. Linearly scale down widths, and heights. Some panes which were narrow in your mockup may become too narrow in the scaling down; allow these to hold their original dimension, and adjust other panes to take up the reduction. Check your drawings against the mockups, make sure they feel ok, and adjust as needed.
Mockup of a particularly elaborate and beautiful set of windows
Checking different patterns of glazing bars
NOW GO TO REPORT MODULE BEFORE CONTINUING. Report on Window Designs. Submit your scale drawings with a key saying which window goes where. If the cost of the windows will be greater than the budget, include your strategy for covering this. But don't shy away; its usually good to spend a bit more on windows, it has a great effect on the quality of the house.
9. Order windows and doors. You may be able to find a large national manufacturer to make what you have designed, but you will probably have better luck with a small local company. Whether wood, or vinyl or aluminum, a local company will probably be more flexible and quicker. If you want to use wood, but don't think custom wood window makers exist in your area, look into small companies that make replacement sash for older houses; they can make new windows for you just as easily.
10. Install windows and doors.
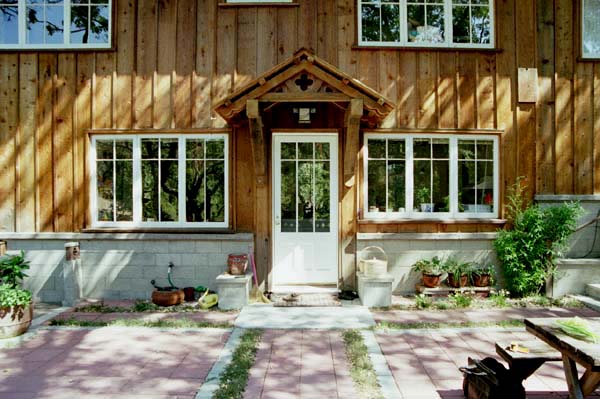
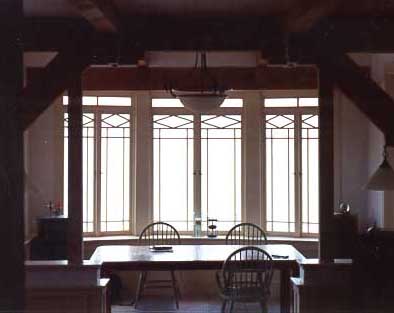
This is what it looks like when "DESIGN WINDOWS AND DOORS" is finished
~ o 0 o ~
20. Finalize Layout of the Kitchen
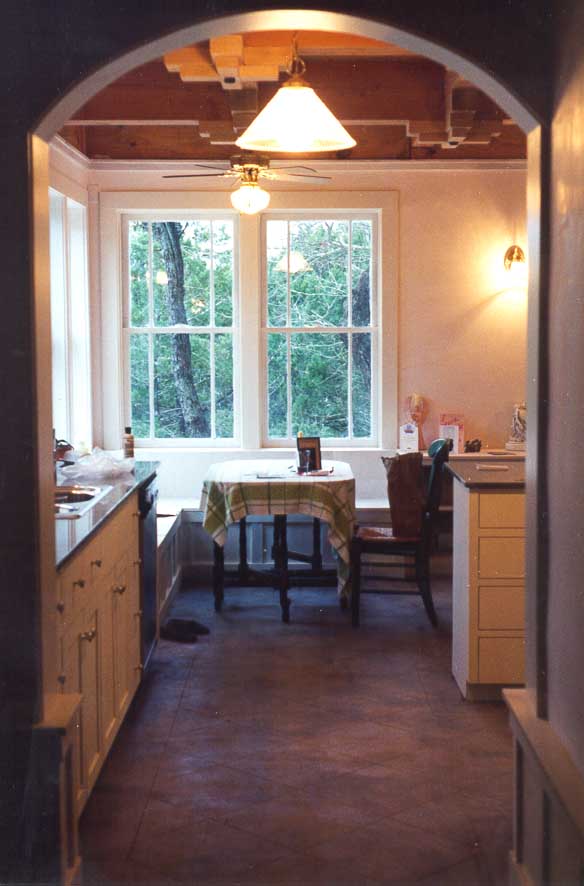
The kitchen is the heart of most beautiful houses; it is a place where everyone congregates to eat, talk, laugh, do homework, read. Now you can shape this place for the family.
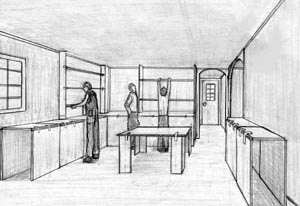
Mocking up the kitchen: Placing the table, work spot, and counters and shelves
Begin with the kitchen layout from the drawings in mind, and follow this process to adjust as necessary.
1. Place the table in the most important place.
a) Start by locating the kitchen table. Even if you can only have a small table, it should be in the best position, a place where you really want to "be" because of light, view, and a sheltered position in regard to traffic in the room. This will be the first center. The table is the source of pleasure and of practical work together.
b) If possible, place a second main center, on one edge of the room, in such a way that it orients and focuses the room. This second major center might be a fireplace near the table, and connected with it. Or the second major center which orients the room might be a real oil-burning stove like an Aga. Or it might be something you just plain like. Put something in the kitchen which makes a meaningful "place" to work with the table.
2. Establish position and size of your main work spot.
a) Now ask yourself where in the room you would like to stand, while preparing food. Wherever it is, put a working counter there. Make sure it is going to be a truly comfortable place to work, deep enough, and long enough. Imagine yourself standing there, and make it so it is a pleasure to be there. The counter is the source of pleasure in work and of practical work together.
3. Put counter and thick walls all around the room.
a) Now make an imaginary swath or band, about 2 feet thick, almost all around the room—the space which will be used for counters, cupboards, and thick walls—wrapping around the table and making it comfortable. When you have done this, you may need to adjust the position of the table in the best place, taking into account this swath of counters and cupboards and trying to make sure the table is still as pleasant and comfortable as possible. The "thick wall and counter" zone is crucial to the comfort of the room.
4. Place subsidiary centers: stove, sink, and refrigerator.
a) Make the counter continue around the room, as far as comfortable and useful. Some of this band may be storage, or cupboards; the rest of it can be open working top. Even cupboards and shelves help to make the room pleasant—because they are practical.
b) Divide the counter part into three areas: (1) The main central working top, you have already settled on, (2) The stove, and (3) The sink and draining board. Each of these should be made to feel like a center in its own right. However, do not exaggerate the importance of the positions of these last two; they should be pleasant and convenient, but it is important not to tie yourself in knots trying to make them meet special conditions. The kitchen will work alright anyway.The counter swath that runs around the room forms its boundary and its enclosure.
c) Do not let the refrigerator mess up the kitchen layout in any way. Put it where it out of the way, and NEVER sacrifice the beauty of the room, for this technical problem. Make the room beautiful and comfortable: this is more important than efficiency.
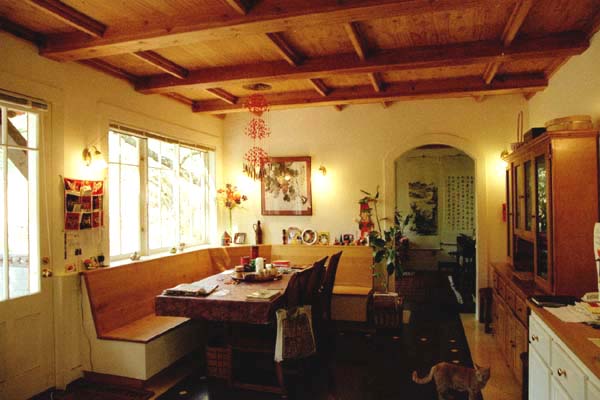
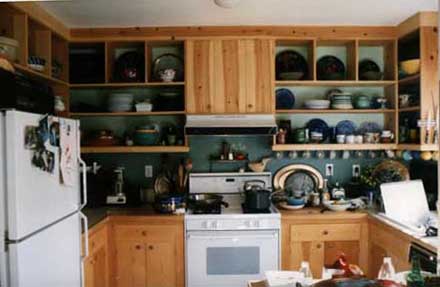
A couple of beautiful kitchens
NOW GO TO REPORT MODULE BEFORE CONTINUING. Report on Overall Kitchen Layout, and Cabinet Design. Submit a kitchen plan, and cabinet elevation. If the cost of the kitchen has increased beyond the estimate, include your strategy for covering the increase.
5. Design cabinetry
a) Make a more elaborate cardboard mockup of a section of cabinetry, to fine-tune the positions and size of cabinet doors, the cabinet frames, countertop detail, handle locations, and so on. Adjust til the all the shapes in the cabinets feel harmonious; for example the door widths and heights should be harmonious with the frame members, and with the drawer fronts, and so on.
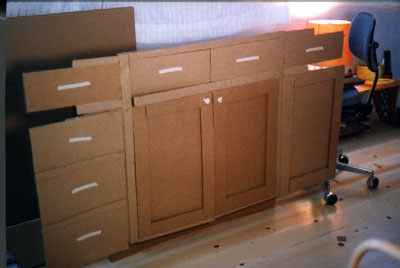
Mocking up exact details of cabinets at full scale
6. Order cabinets.
7. Rough in kitchen plumbing (see operation 21 below).
8. Install cabinets when they arrive.
9. Install any built-ins you've come up with.
10. Install countertops.
~ o 0 o ~
21. Bathroom Layout and Complete Rough-in Plumbing
You will need to rough in the plumbing now. You have just laid out the kitchen fixtures, now you need to adjust and finalize the other fixture locations in the house, and then you can rough in all of the plumbing lines.
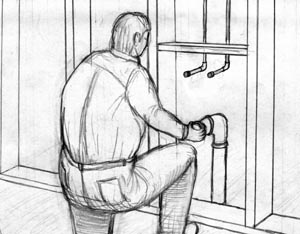
Roughing in plumbing
1. Lay out the bathrooms, and any other room with plumbing. Begin with the layout in the drawings, and lay out the bathrooms in place on the floor with bits of wood, chalk, block, etc. Adjust if you feel it needs to be improved. Check the new layouts with the client. Record the layout, and location of plumbing fixtures.
NOW GO TO REPORT MODULE BEFORE CONTINUING. Report on Bathroom Layout and Fixture Selections.
2. Choose plumbing fixtures together with client.
3. Install rough-in plumbing lines, and order plumbing fixtures.
~ o 0 o ~
22. Roofing and Exterior Siding
Now you will install the remaining exterior materials of the house. Now is the time to final check the materials and details, and fine-tune as necessary.
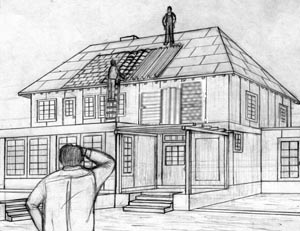
Trying out several materials on the roof and wall
1. Mock up roof and wall materials, as shown in drawings. Start with the materials specified in the drawings, and see how this palette of materials feels on the house. Put up a mockup of roofing material on the roof, and siding material on the walls. The materials should be harmonious the heavy wall materials, with the site, in general with the building so far.
2. Try alternatives, and adjust. Look back to the materials you preferred in your experiments from Operation 5. Try out several materials on the roof, actually putting up at least say twenty square feet of each, to look at the material as it will really feel. Compare one to another. Which materials harmonize best?
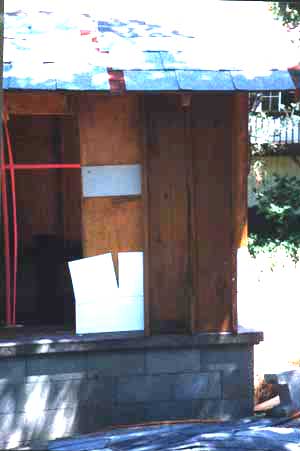

Trying different materials
3. What is the distribution of these materials? You may consider using more than one roofing or wall finish material on the house. For example, perhaps the roof over the heavy wall portions of the house is one material, perhaps tile. And perhaps the roof over the framed portions of the house is another more light-weight material. Or another example: house roofs are one material, and smaller porch roofs are another. Like the wall materials, spending money differentially on different parts of the house might be appropriate. But be careful to keep it simple.
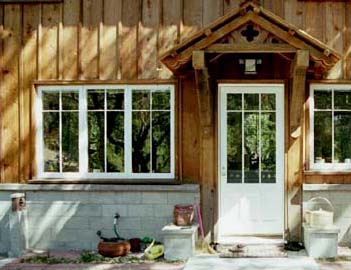

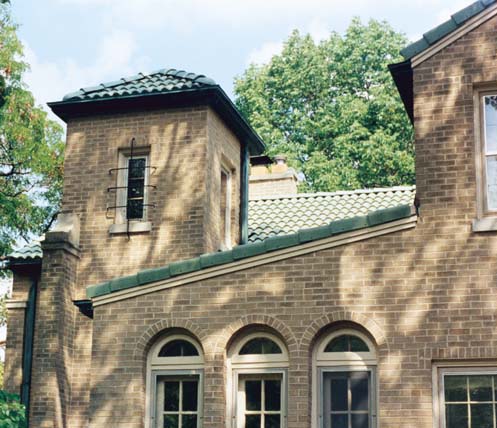
A few examples of materials
4. Determine trim material, sizes, and color. Get out your table saw, and some scrap 1 x material. Try different widths for trim, different profiles. The trim should harmonize with the exterior materials, and the dimensions of the windows and way the windows are divided into panes. It may take a bit of effort to get a trim scheme that really harmonizes with the windows. You may come up with more than one trim scheme, depending on the window. But try to limit the number of different trim schemes, if possible use the same one throughout the house.
NOW GO TO REPORT MODULE BEFORE CONTINUING. Report on your decisions for Roofing material, color, and distribution (if there are more than one roof materials), exterior materials and trim. If the cost is higher than budgeted, include your strategy for paying for this increase.
3. Install roofing.
4. Install siding and trim.

This is what it looks like when "INSTALL ROOF AND EXTERIOR SIDING" is finished
~ o 0 o ~
23. Place Lighting and Outlets
Deciding the placement of lighting fixtures is a critical step. Lighting that is well placed will dramatically reinforce the natural life you have created in the house so far. You spent a great deal of effort and care placing windows, to give the house light and life during the day. Give this step the same care and attention, and the house will be equally alive at night…
Be patient, this is hard work, but important to do carefully. It may take more than one evening, depending on the size of the house.
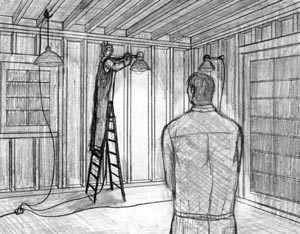
Locating lighting fixture locations, by doing mockups at night
1. Working one room at a time, lay out an initial version of lighting fixture locations. Get a lot of clamp-on lights, shop lights, and extension cords. You will need at least a dozen lights. Go to the house at night, and work on just one or two rooms at a time. Place lights around a given room, beginning with the layout shown in the drawings. Turn them on.
2. Adjust positions of lights: Is the lighting reinforcing and supporting the natural centers, the places to be in the room? Are the natural centers, sitting areas and so on, reinforced by the position of the lights? For example, when you sit is the light near enough to you to comfortably read by? Can you comfortably see the face of the person you would be sitting and talking to? That face is a center, that should be reinforced by the position of the light.
Adjust the positions of the lights til the lights reinforce and enliven the room and its natural centers, its places to be. In your design you can use wall mounted lights, ceiling mounted, hanging fixtures, lamps, and so on. Of course plug-in lamps will be part of the lighting too, keep that in mind. But if you can use built-in lighting fixtures to provide much of the lighting, the house will likely be very pleasant.
3. Is the brightness level about right? (not too bright, not too dim.) If not, adjust. You can increase or reduce bulb wattage, or numbers of bulbs per fixture, or add and remove fixtures. Adjust til the brightness is comfortable in the room.
4. Simplify and adjust the lights in the room, so that they form a family. Make lights that are about the same, actually the same. For example, if there are three wall mounted lamps mocked up in the same room at slightly different heights, adjust to make them the same height.
5. Record your designs. Carefully record the location of each of the lights you propose: position in plan, height, and lamp type, number of bulbs and wattage. One hint: to accurately record height, so that the final fixtures will feel like the mockup, you should record height by recording height of the bottom of the bulb from the floor.
Repeat these 5 steps for each room of the house. (It's often helpful to work from room to neighboring room, leaving the first room mockup standing while working on the next room—because the lighting in adjacent rooms may affect one another.)
6. Place electrical outlets throughout house. Place outlets in logical places, especially where lamps might be placed, and other appliances might obviously be. Make sure to conform to code requirements. Consider using switched outlets for lamps, especially if the lamp is far from the door into the room.
7. Choose lighting fixtures together with client. Simpler is usually better, and usually cheaper too. Expensive fixtures are often ostentatious and even ugly. Lighting and plumbing fixtures should support the life in the house, rather than draw too much attention to themselves.
NOW GO TO REPORT MODULE BEFORE CONTINUING. Report on Lighting Fixture Layout, and Lighting Fixture Choices: Submit small plans of the house, with fixture locations and heights noted. Submit tear sheets for lighting fixtures. If the cost of the lighting and electrical is higher than budgeted, (more lights, etc,), include your strategy for covering the cost.
8. Install electrical rough-in. Based on fixtures, and bulb positions recorded in step 5, place rough-in boxes for lighting. Based on the type of fixture, you will need to adjust the dimensions you recorded, to adjust for the fact the relationship between the bulb position and the rough-in box is different for each style of lamp.
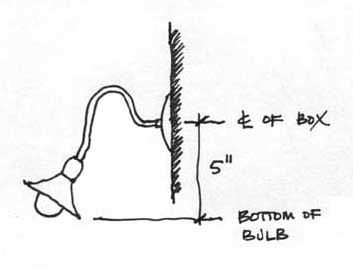
In this example, for this style of lamp, rough in the box 5 inches higher than the measurement you took from your mockup.
~ o 0 o ~
24. Embellish the Exterior: Do Finish Work on Terraces, Garden Walls, and Exterior Works
Now you will bring the terraces to life. You have set the boundaries and levels, and built them to this extent. Now really bring them to life, as places to be, everyday, places as lively as the rooms in the house, and deeply connected to the life in the house.
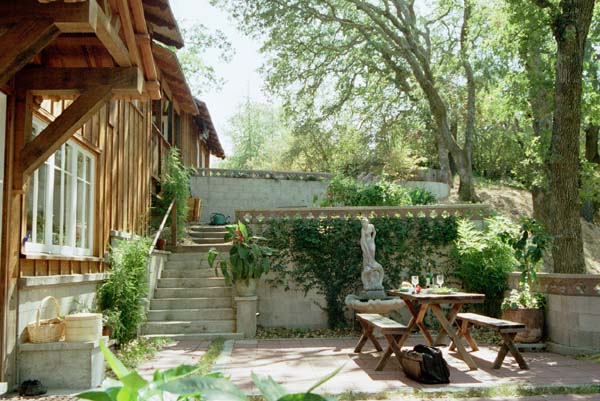
An example of an outdoor terrace, as important as any room in the house
1. Mark and mock up the major center for each of the outdoor spaces. Look back at your notes from Operation 6, when you roughly built the terraces. What is the major center for each area? A table with chairs? A firepit? A built in bench alcove? Mock it up.
2. Determine the enclosure of these outdoor rooms, to reinforce and support this center. The space may need railings, sitting walls, trellises, arbors, to enclose and shape them. Shape the enclosure til the major center feels utterly comfortable; both part of the house and part of the outdoors.
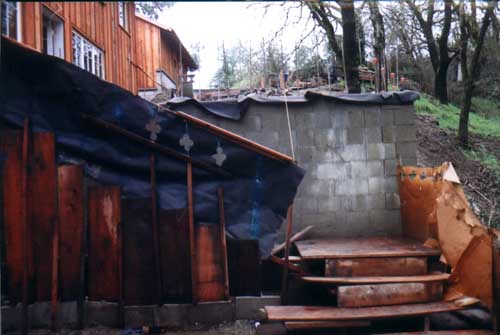
3. Add other elements that bring the space to life; stairways, paving, built-in seats, and so on. Once you have the degree of enclosure that seems right, embellish the terraces further.
4. Finetune materials and detailed designs for all these embellishments.
NOW GO TO REPORT MODULE BEFORE CONTINUING. Report on your design for the Outdoor Terraces, including any embellishing details you've come up with. If the are cost implications, include your budget strategy.
5. Build the embellishments you have come up with.
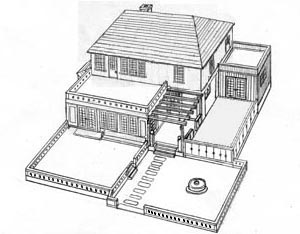
This is what it looks like when "EMBELLISH THE EXTERIOR" is finished
~ o 0 o ~
25. Insulate House
No design decisions are needed here.
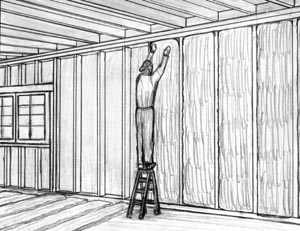
Installing insulation
1. Order and install insulation.
~ o 0 o ~
26. Install Wall and Ceiling Finishes and Flooring
Find a palette of beautiful finish materials, things you can sit near and feel happy. They don't necessarily need to be fancy or expensive. A comfortable handmade feel is most important.
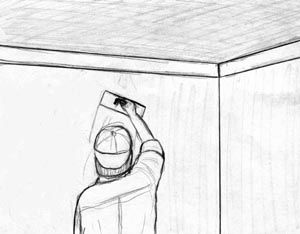
Installing interior plaster
1. Determine type, distribution, and color of interior wall and ceiling finishes in the most important rooms. Again, think about using more expensive materials in the most important rooms, and saving money in others. Ask the client where they will be spending a lot of time, perhaps you'll get an unexpected answer. Put the nicest materials in those places. Some materials to keep in mind: hardtrowelled plaster, perhaps with an integral color, tile, (perhaps handglazed), 1x wood, painted plywood or masonite, sheetrock, and so on. Be inventive; you can use uncommon materials, or use common materials in an innovative way. Above all, use materials that feel nice to be next to. Mock up the room with some real material samples, for all major surfaces; walls, ceiling, and floors.
2. Determine the floor material in the most important rooms. The flooring will be one of the elements which change the feeling of the building from a construction site to a finished house. A floor should be comfortable, beautiful, durable…
3. Go do the same in all the other rooms in the house. In the lesser rooms of the house, follow the same process, but consider simpler, cheaper materials.
4. Adjust and simplify if needed. Do you have a different palette of materials for each room in the house? This may be too much. Perhaps just two or three palettes at most will do.
NOW GO TO REPORT MODULE BEFORE CONTINUING. Report on your choices for Interior Finishes, and how they're distributed. If there are any cost implications in your choices, include your strategy for keeping within the overall budget.
5. Install wall and ceiling finishes.
6. Install flooring.
~ o 0 o ~
27. Install Built-in Furniture
Built-in seating, shelves, cabinets and so on, are a way to make the house feel seamless, united, comfortable, cradling you, like a piece of furniture…
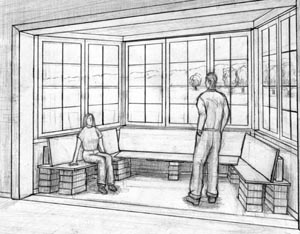
Trying out a full-scale mockup of a built-in bench
1. Find places that would be dramatically improved with built-ins, rather than freestanding furniture. Some examples of places that can be really helped by built-ins: a kitchen or dining table which has built-in benches, a bay window with a window seat, a fireplace nook with built-in seats, a study or library with a wall of built-in shelves, a bedroom with a bed alcove, and so on. Identify a few places like this in the house.
2. Determine rough configuration of built-ins. Mock up the built-in, at full scale. You can use cardboard for ease and speed, but make sure all sitting mockups are able to be sat on. Put supports like blocks and boards inside them to allow this; otherwise you won't be able to evaluate them. Just looking is not enough, you must sit in them.
3. Determine fine details and construction method. Once you have the general configuration, determine the fine details and proportions. Use cardboard, or 1x scrap.
4. Record design, and make scale drawings.
NOW GO TO REPORT MODULE BEFORE CONTINUING. Report on Built-ins you've come up with. If they will cost more than is budgeted, include your strategy for paying for them.
5. Install built-ins. Hint: If the built-ins cover any outlets or lights that have already been roughed in, it is usually easy enough to relocate them. For example, an outlet low in a wall that is subsequently covered by a built-in bench, can be brought forward and reset in the kick of the bench.
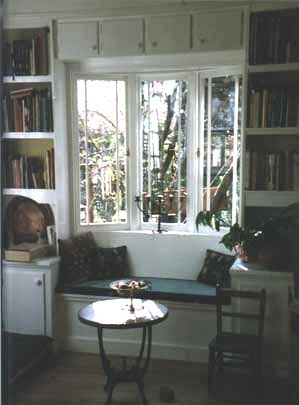
~ o 0 o ~
28. Interior Finish Carpentry
Trim and casework complete the job started by the built-ins, they make the house feel seamless, united, comfortable, cradling you, like a piece of furniture.
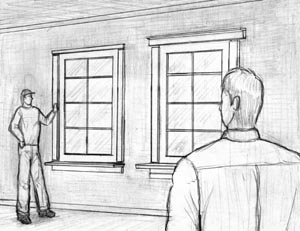
Using mockups to check different trim ideas
1. Lay out bathrooms and cabinets. A simple comfortable layout should be your goal. People don't spend that much time in the bathroom really; so don't make it one of the fanciest rooms in the house.
2. Determine material, sizes, and configuration of interior trim. Get some 1x scrap, and a table saw. Try a variety of trim ideas. You can use differing widths and thicknesses for side casings, and head casings, and water tables. You might try a router to shape the inner edge of the trim.
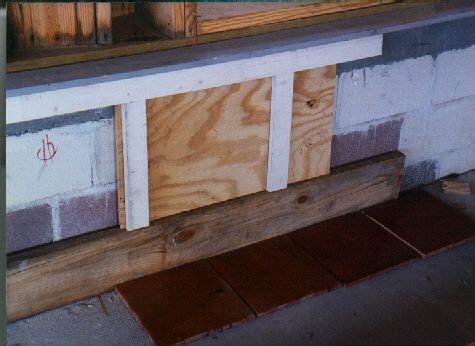
A mockup of wainscot and floor tiles
3. Check trim scheme on windows of varying sizes; adjust. A trim scheme that works on a very large window might not work on a very small window. Try to find a trim scheme that works on all the windows, equally well.
NOW GO TO REPORT MODULE BEFORE CONTINUING. Report on your Trim Schemes. Show dimensioned scale sketches. If the cost will exceed the amount budget, include your budget strategy.
4. Install trim and cabinets.
~ o 0 o ~
29. Install Plumbing and Lighting Fixtures
The plumbing and electrical layout you came up with earlier will now be completed…No design decisions are needed here.
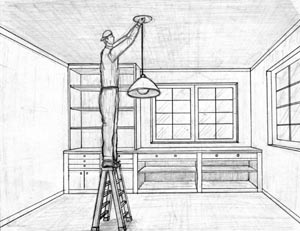
Installing lighting fixtures
1. Install plumbing and electrical fixtures. Remember, when in doubt, simpler and cheaper is definitely better here. The ugliest light fixtures are often the most expensive. Plumbing and light fixtures should support the life in the house, not draw too much attention to themselves.
~ o 0 o ~
30. Build Garage and Driveway
If there is a freestanding garage or carport, now is the time to build it, as the need for construction access to the house is diminishing.
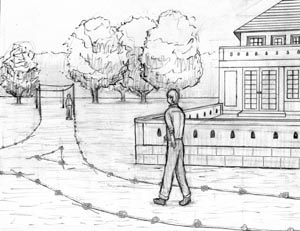
Finetuning the position of the garage, driveway, and pedestrian path using surveyor's ribbon
1. Finetune position and height of garage. Go back to the layout you came up with in operation 1. Finetune the position and height of the garage, keeping a careful eye out to the house. Don't let the garage dominate the house. Tuck it in, and make as unobtrusive as you can.
2. Place route and width of driveway. Mock up the driveway's path and width. You can use two lengths of rope or surveyor's ribbon, one for each side. In general, you should keep the drive as narrow as possible. Adjust until it feels right. Record the design by deeply setting stakes, that can survive long enough to guide the installer.
3. Determine drive material. Most driveways cover a large amount of land, and are in a sense one of the biggest components of the house. And so use a material that is comfortable to be near; consider crushed rock rather than asphalt, or concrete tire pavers with grass between, rather than a solid concrete drive.
4. Be sure that the access on foot to the house, either from the street, or from the garage, is a beautiful path. Adjust garage and drive until this is absolutely true. Coming home and leaving, every day, for years and years, should be and remain a comfortable and beautiful experience. Make that your goal.
NOW GO TO REPORT MODULE BEFORE CONTINUING. Report on your Adjustments to the Garage and drive design and location. If there are any budget implications, include your strategy for covering this.
5. Install built-ins.
6. Install driveway.
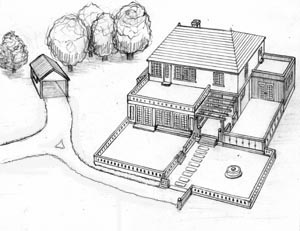
This is what it looks like when "BUILD GARAGE" is finished
~ o 0 o ~
31. Color
Color is one of the more difficult parts of making a house, but also one of the very most important…
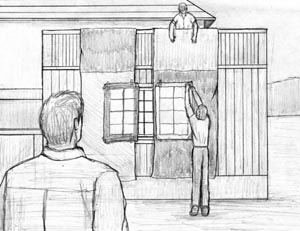
Trying an experiment with some colors on the wall
One thing to keep in mind: colors can be repainted. So don't be afraid to try something, you can redo it. Also, if the clients are interested in color, they can continue to finetune and adjust even after they move in.
~ o 0 o ~
32. Finishing Touches to Really Bring the House to Life
Look around the house, for final opportunities to embellish it and bring it to life. In a beautiful painting, often the last small splashes of color are what make the difference.
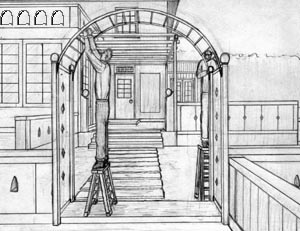
Building a gateway
1. Look for parts of the house that aren't quite what they could be…
2. What can bring them to life?
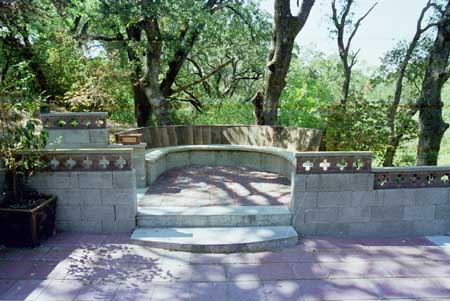

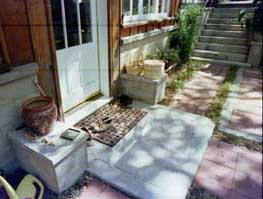
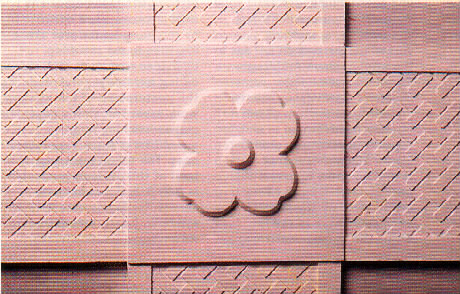
NOW GO TO REPORT MODULE BEFORE CONTINUING. Report on any beautiful Embellishments you propose to make. Include your strategy to pay for them.
3. Install your final embellishments.
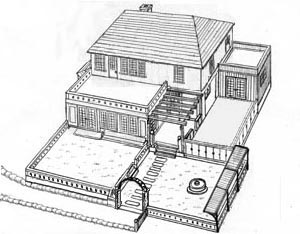
This is what it looks like when "FINISHING TOUCHES" is finished
~ o 0 o ~
33. Give the House to the Owner
You've finished the house, working together for months with the client. Its like you've made a special gift for them; now is the time to give it away.
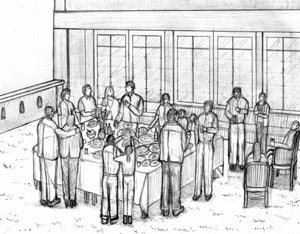
Having a party
1. Have a party. Organize a party to hand over the house to the client, and invite the client, family, friends, and the men and women who made the house. Don't wait for a house warming party after the clients move in; (as often as not that party never happens, as the clients spend their time moving and getting settled). Now is the time for you to offer to them your hard work, given with your heart. Now is the time for them to accept your gift, your work and efforts so far above and beyond the way houses are normally produced nowadays. Celebrate!!!!

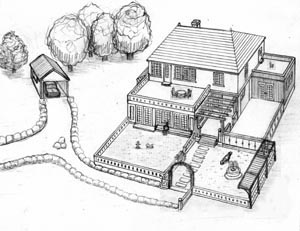
This is what it looks like when construction is finished