Making decisions in the right order when you lay out a kitchen controls the resulting comfort of the kitchen. In some cases the "right" order is highly unexpected.

A kitchen made using the sequence

Kitchen

If you get these steps in the right order, there is a good chance the kitchen will be comfortable. The windows and the table dominate everything.

A kitchen made using the sequence
A PROCESS FOR MAKING A KITCHEN
  1. STEP 1: MENTAL PREPARATION
  2. STEP 2: THE WHOLE: ESTABLISH ROUGH PARAMETERS AND SOURCES OF LIGHT
  3. STEP 3: THE FIRST CENTER: PUT THE TABLE IN THE BEST PLACE
  4. STEP 4: THE NEXT CENTER: ESTABLISH POSITION AND SIZE OF YOUR MAIN WORK SPOT
  5. STEP 5: PUT COUNTER AND THICK WALLS ALL AROUND THE ROOM
  6. STEP 6: PLACE SUBSIDIARY CENTERS: STOVE, SINK, AND REFRIGERATOR
  7. FINISH
Step 1: Mental preparation

1. Relax and Be Truthful and Make Notes

Your feelings are the most important. Just be unworried, relaxed about trial and error, and be very truthful with yourself about what makes you feel good.

Spend a lot of time looking at photographs of kitchens that you really like and articulate to yourself what it is you like about them. Keep them in a folder or marked in books so that you can easily refer to them.

Think a lot about yourself in the kitchen, the other people you live with and what kinds of activities are important. You may entertain and enjoy cooking or maybe elaborate meals are a rare event. It may be really important to you to be able to have young children play in the kitchen during meal preparation, or to be able to keep an eye on older children playing in the garden. There may be a student in the house who would like to work late at night at the kitchen table with coffee pot close at hand. You may have a dog or cat and they need to be included.

YOU NOW HAVE YOUR NOTES ON WHAT SHOULD BE HAPPENING IN THE KITCHEN AND IDEAS FROM KITCHENS YOU LIKE.

2. Organize your notes into potential centers.

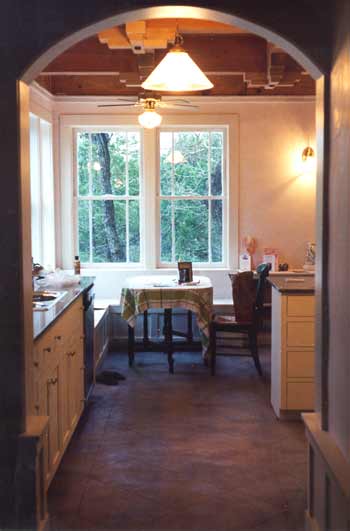
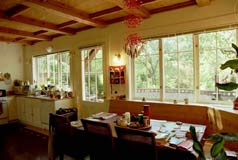
Kitchens like all other rooms are composed of centers. Typical centers will be either objects like windows or sink or activity areas such as the table and chairs (or benches) and the quiet bubble of air that surrounds it and working counter area. Each one, as it comes up in the sequence will receive your full attention as to its own organization and how it relates to the ones already in place. In the end they will all support each other in a collective strength which gives you, whether your kitchen is small or large, modest or high end, a comfortable place to work and just "be."

Keep thinking of this room as a major place to "be" in… a place that is not a utility, but a real center for life in the house. Your choice of centers is personal. It could include or not a connection to the outside, a work spot for crafts, bar stools and high counter, a service window to a formal dining area, a place to grow herbs. It's YOUR kitchen.

YOU NOW HAVE YOUR IDEAS ON WHAT CENTERS YOU WANT


This completes step 1.
Step 2: The whole: establish rough parameters and sources of light

Keep the Big Picture in Mind

As you add or change elements in the design process, consider how each change impacts the kitchen as a whole. In the initial phase consider the room itself, its size and shape. Sometimes a small kitchen can be made bigger or have a more comfortable shape by moving walls, making half walls, or extending a window area. Sometimes we simply must make do with the space we've got.

Work with a pad of tracing paper and make a basic outline of the room with planned or existing windows and doors and keep it as a template that you can quickly retrace again and again as you experiment. It can be a rough outline like in the short movie clip in the preceding page as long as the proportions are right.

Does the room need more light? Kitchens do need generous daylight so you may now decide where a larger or an additional window should be by standing in the room. Mark the position on your drawing.

Make a beautiful window which will bring life and air to the room. Have a look at patternlanguage.com for the sequences on window placement and window design.

YOU NOW HAVE YOUR OUTLINE OF THE WHOLE SPACE

This completes step 2.
Step 3: The first center: put the table in the best place

1. Start by locating the kitchen table.

The table will be the first and most important center. It will be where you share meals, talk, work, and relax with a cup of coffee. Even if you can only have a small table, it should be in the best position, a place where you really want to "be" because of light, view, and a sheltered position in regard to traffic in the room.

The table is the source of pleasure and of practical work together. A low hanging lamp provides a pool of light in the evening which will be more comfortable than homogeneous lighting.

2. If possible, place a second main center, on one edge of the room, in such a way that it adds life to the room.

This second major center might be a fireplace near the table, and connected with it. Or the second major center which orients the room might be a real oil-burning stove like an Aga. Or it might be something you just plain like such as a deep windowsill that can hold flowering plants. So look back at the first step, where you identified activities or features that are important to you in a kitchen. Pick one of these as your second center.

lace the second center in the kitchen which makes it a meaningful "place" for you and which, like the table, gives a focal point to the room. Reconsider the "whole" room and check that the placement of the table and this possible second center now give more feeling and structure to the whole space.

YOU HAVE NOW PLACED TWO CENTERS


This completes step 3.
Step 4: The next center: establish position and size of your main work spot

Now ask yourself where in the room you would like to stand while preparing food?

Wherever it is, put a working counter there. Make sure it is going to be a truly comfortable place to work, deep enough, and long enough. Imagine yourself standing there, and make it so it is a pleasure to be there.

The counter is the source of pleasure in work and of practical work together. This spot in the room which is comfortable for you needs to be determined BEFORE you place the appliances.

YOU NOW HAVE THE MOST IMPORTANT WORKSPOT

This completes step 4.
Step 5: Put counter and thick walls all around the room

Now make an imaginary swath or band, about 2 feet thick, almost all around the room.

The space will be used for counters, cupboards, and thick walls – wrapping around the table and making it comfortable. When you have done this, you may need to adjust the position of the table in the best place, taking into account this swath of counters and cupboards and trying to make sure the table is still as pleasant and comfortable as possible.

YOU HAVE NOW DRAWN YOUR THICK WALLS AND MORE FINELY ADJUSTED YOUR TWO CENTERS

The "thick wall and counter zone" is crucial to the comfort and effectiveness of the room as a kitchen. Thick walls are what identifies a house as yours.

This completes step 5.
Step 6: Place subsidiary centers: stove, sink, and refrigerator

1. Make the counter continue around the room, as far as comfortable and useful.

Some of this band may be storage, or cupboards; the rest of it can be open working top. Remember that deep cupboards are often not handy because what you want is always behind something else.

Even cupboards and shelves help to make the room pleasant – because they are practical.

2. Divide the counter part into three areas:

(a) the main central working top, you have already settled on,
(b) the stove, and
(c) the sink and draining board.

Each of these should be made to feel like a center in its own right. However, do not exaggerate the importance of the positions of these last two; they should be pleasant and convenient and, typically, not more than ten feet between them, but it is important not to tie yourself in knots trying to make them meet special conditions. The kitchen will work alright anyway. Also remember that if you are remodeling an existing kitchen, the placement of the sink and stove can be changed; it is not necessarily a big deal to move them to where they really belong.

The counter swath that runs around the room forms its boundary and its enclosure.

3. Do not let the refrigerator mess up the kitchen layout in any way.

You will find that you can put it out of the way and your kitchen will still work well.

Make the room beautiful and comfortable: this is what is important.

YOU NOW HAVE PLACED THE SUBSIDIARY CENTERS

You are now ready to proceed with implementation either by yourself or through a contractor.


Finish.